<?xml version="1.0" encoding="utf-8"?>
<feed xmlns="http://www.w3.org/2005/Atom">

  <title><![CDATA[Pebble Developers]]></title>
  <link href="http://pebble.lunarians.net/atom.xml" rel="self"/>
  <link href="http://pebble.lunarians.net/"/>
  <updated>2025-12-29T11:59:31+00:00</updated>
  <id>http://pebble.lunarians.net/</id>
  <author>
    <name><![CDATA[]]></name>
    
  </author>
  <generator uri="http://octopress.org/">Octopress</generator>

  
  <entry>
    <title type="html"><![CDATA[Pebble.js - Pebble Package Edition!]]></title>
    <link href="http://pebble.lunarians.net/blog/2016/12/22/pebblejs-package/"/>
    <updated>2016-12-22T00:00:00+00:00</updated>
    <id>http://pebble.lunarians.net/blog/2016/12/22/pebblejs-package</id>
    <content type="html"><![CDATA[<p>We&#39;re pleased to announce that <a href="https://pebble.github.io/pebblejs/" title="" class="">Pebble.js</a>
has now been <a href="https://www.npmjs.com/package/pebblejs" title="" class="">published</a> as a
<a href="/guides/pebble-packages"><em>Pebble Package</em></a>. Pebble.js lets developers
easily create Pebble applications using JavaScript by executing the JavaScript
code within the mobile application on a user&#39;s phone, rather than on the watch.</p><p><img src="/assets/images/blog/2016-12-22-pebble-js.jpg" alt="Pebble.js as a Pebble Package" /></p><p>Making Pebble.js a Pebble Package means Pebble.js projects can be converted to
standard Pebble C projects. This gives benefits like the ability to
easily utilize other Pebble Packages, such as
<a href="https://www.npmjs.com/package/pebble-clay" title="" class="">Clay for Pebble</a>, or easily
importing and exporting the project with
<a href="" title="" class="">CloudPebble</a>.</p><p>The Pebble.js package is using the
<a href="https://github.com/pebble/pebblejs/tree/develop" title="" class=""><code>develop</code></a> branch from the
<a href="https://github.com/pebble/pebblejs" title="" class="">Pebble.js repository</a> on Github, and
can be updated independently from CloudPebble deployments.</p><p><strong>It also supports the Diorite platform!</strong>.</p><h2 id="creating-a-new-project" class="anchor">Creating a New Project</h2><p>The initial steps vary if you&#39;re using CloudPebble or the Local SDK. Follow the
appropriate steps below to create a new project.</p><h4 id="cloudpebble" class="anchor">CloudPebble</h4><p>If you&#39;re using CloudPebble, follow these initial steps:</p>
<ol>
<li><p>Create a new project:</p>
<ul>
<li>Project Type = Pebble C SDK</li>
<li>Template = Empty Project</li>
</ul></li>
<li><p>Add the following dependency:</p>
<ul>
<li>Package Name = pebblejs</li>
<li>Version = 1.0.0</li>
</ul></li>
<li><p>Add a new <code>main.c</code> file and an <code>index.js</code> file.</p></li>
</ol>
<p>Now continue to add the <a href="#default-project-files" title="" class="">default project files</a>.</p><h4 id="local-sdk" class="anchor">Local SDK</h4><p>If you&#39;re using the Local SDK, just create a new C project with Javascript
support:</p><div class="highlight no-copy"><pre>$ pebble new-project PROJECTNAME --javascript
</pre></div><p>Now continue to add the <a href="#default-project-files" title="" class="">default project files</a>.</p><h4 id="default-project-files" class="anchor">Default Project Files</h4><p>Copy and paste these default project files into your project, replacing any
existing file contents:</p><p><strong>your-main.c</strong></p><div class="highlight"><pre><span></span><span class="cp">#include</span><span class="w"> </span><span class="cpf">&lt;pebble.h&gt;</span>
<span class="cp">#include</span><span class="w"> </span><span class="cpf">"pebblejs/simply.h"</span>

<span class="kt">int</span><span class="w"> </span><span class="nf">main</span><span class="p">(</span><span class="kt">void</span><span class="p">)</span><span class="w"> </span><span class="p">{</span>
<span class="w">  </span><span class="n">Simply</span><span class="w"> </span><span class="o">*</span><span class="n">simply</span><span class="w"> </span><span class="o">=</span><span class="w"> </span><span class="n">simply_create</span><span class="p">();</span>
<span class="w">  </span><span class="n">app_event_loop</span><span class="p">();</span>
<span class="w">  </span><span class="n">simply_destroy</span><span class="p">(</span><span class="n">simply</span><span class="p">);</span>
<span class="p">}</span>
</pre></div><p><strong>index.js</strong></p><div class="highlight"><pre><span></span><span class="nx">require</span><span class="p">(</span><span class="s1">'pebblejs'</span><span class="p">);</span>
<span class="kd">var</span><span class="w"> </span><span class="nx">UI</span><span class="w"> </span><span class="o">=</span><span class="w"> </span><span class="nx">require</span><span class="p">(</span><span class="s1">'pebblejs/ui'</span><span class="p">);</span>

<span class="kd">var</span><span class="w"> </span><span class="nx">card</span><span class="w"> </span><span class="o">=</span><span class="w"> </span><span class="ow">new</span><span class="w"> </span><span class="nx">UI</span><span class="p">.</span><span class="nx">Card</span><span class="p">({</span>
<span class="w">  </span><span class="nx">title</span><span class="o">:</span><span class="w"> </span><span class="s1">'Hello World'</span><span class="p">,</span>
<span class="w">  </span><span class="nx">body</span><span class="o">:</span><span class="w"> </span><span class="s1">'This is your first Pebble app!'</span><span class="p">,</span>
<span class="w">  </span><span class="nx">scrollable</span><span class="o">:</span><span class="w"> </span><span class="kc">true</span>
<span class="p">});</span>

<span class="nx">card</span><span class="p">.</span><span class="nx">show</span><span class="p">();</span>
</pre></div><p>At this point you should be able to compile and run your new project.</p><h2 id="migrating-an-existing-project" class="anchor">Migrating an Existing Project</h2><p>Unfortunately there isn&#39;t an automated way to migrate your existing Pebble.js
project, but the steps are fairly straightforward.</p>
<ol>
<li><p>Create a new project, following the <a href="#creating-a-new-project" title="" class="">steps above</a>.</p></li>
<li><p>Change the project settings to match your old project settings, including the
UUID.</p></li>
<li><p>Copy your project resources (images, fonts etc.), and source files into the
new project.</p></li>
<li><p>Compile and enjoy your new C project with Pebble.js support.</p></li>
</ol>

<blockquote>
<p>Note: <code>index.js</code> is a direct replacement for <code>app.js</code>, which may be your old
Javascript file.</p></blockquote>
<h2 id="next-steps" class="anchor">Next Steps?</h2><p>Want to add Clay support to your project? It&#39;s now easy by following the
standard Clay <a href="https://github.com/pebble/clay#clay" title="" class="">Getting Started</a>
instructions!</p><p>If you have any questions or problems, post the details on the
<a href="https://forums.pebble.com/t/pebble-js-pebble-package-edition/27315" title="" class="">developer forum</a>
or <a href="http://discord.gg/aRUAYFN" title="" class="">Discord</a>.</p><p>Happy Holidays!</p><p>Jon Barlow + Team #PEBBLExFITBIT</p>]]></content>
  </entry>
  
  <entry>
    <title type="html"><![CDATA[Announcing Pebble SDK 4.3]]></title>
    <link href="http://pebble.lunarians.net/blog/2016/11/23/Announcing-Pebble-SDK-4.3/"/>
    <updated>2016-11-23T00:00:00+00:00</updated>
    <id>http://pebble.lunarians.net/blog/2016/11/23/Announcing-Pebble-SDK-4.3</id>
    <content type="html"><![CDATA[<p>Things have been a bit &#39;quiet&#39; recently, but we&#39;re back with another fresh
Pebble SDK! In this release we&#39;ve included one of the most frequently requested
APIs, exposed the raw HRM sensor value, released PebbleKit 4.0, plus added an
exciting new BLE HRM mode.</p><h2 id="it-39-s-oh-so-quiet-ssshhhhhh" class="anchor">It&#39;s. Oh. So quiet. Ssshhhhhh.</h2><p>We&#39;ve added an often requested method for developers to detect if <em>Quiet Time</em>
is enabled. To say that we had a lot of requests for this would be an
understatement.</p><p><em>Quiet Time</em> can be enabled manually, via calendar events, or via scheduled
times, so we&#39;ve made a simple method for querying whether it&#39;s currently active.</p><p>All you need to do is check each minute if it&#39;s active. This is easily done
within the tick event, as follows:</p><div class="highlight"><pre><span></span><span class="k">static</span><span class="w"> </span><span class="kt">void</span><span class="w"> </span><span class="nf">handle_tick</span><span class="p">(</span><span class="k">struct</span><span class="w"> </span><span class="nc">tm</span><span class="w"> </span><span class="o">*</span><span class="n">tick_time</span><span class="p">,</span><span class="w"> </span><span class="n">TimeUnits</span><span class="w"> </span><span class="n">units_changed</span><span class="p">)</span><span class="w"> </span><span class="p">{</span>
<span class="w">  </span><span class="k">if</span><span class="w"> </span><span class="p">(</span><span class="n">units_changed</span><span class="w"> </span><span class="o">&amp;</span><span class="w"> </span><span class="n">MINUTE_UNIT</span><span class="p">)</span><span class="w"> </span><span class="p">{</span>
<span class="w">    </span><span class="k">if</span><span class="w"> </span><span class="p">(</span><span class="n">quiet_time_is_active</span><span class="p">())</span><span class="w"> </span><span class="p">{</span>
<span class="w">      </span><span class="c1">// It's nice and quiet</span>
<span class="w">    </span><span class="p">}</span><span class="w"> </span><span class="k">else</span><span class="w"> </span><span class="p">{</span>
<span class="w">      </span><span class="c1">// Starts another big riot</span>
<span class="w">    </span><span class="p">}</span>
<span class="w">  </span><span class="p">}</span>
<span class="p">}</span>
</pre></div><p>You may also peek this value, for example, to prevent your application from
vibrating during <em>Quiet Time</em>:</p><div class="highlight"><pre><span></span><span class="k">static</span><span class="w"> </span><span class="kt">void</span><span class="w"> </span><span class="nf">do_vibration</span><span class="p">()</span><span class="w"> </span><span class="p">{</span>
<span class="w">  </span><span class="k">if</span><span class="w"> </span><span class="p">(</span><span class="o">!</span><span class="n">quiet_time_is_active</span><span class="p">())</span><span class="w"> </span><span class="p">{</span>
<span class="w">    </span><span class="n">vibes_short_pulse</span><span class="p">();</span>
<span class="w">  </span><span class="p">}</span>
<span class="p">}</span>
</pre></div><h2 id="raw-hrm-bpm" class="anchor">Raw HRM BPM</h2><p>The Pebble <a href="``HealthService``" title="" class="">Health API</a> now exposes the raw BPM value from
the Heart Rate Monitor sensor. This raw value is not filtered and is useful for
applications which need to display the real-time sensor value, similar to the
Pebble Workout app.</p><p>For example, in order to peek the current real-time HRM sensor, you would do the
following:</p><div class="highlight"><pre><span></span><span class="n">HealthServiceAccessibilityMask</span><span class="w"> </span><span class="n">hr</span><span class="w"> </span><span class="o">=</span><span class="w"> </span><span class="n">health_service_metric_accessible</span><span class="p">(</span><span class="n">HealthMetricHeartRateRawBPM</span><span class="p">,</span><span class="w"> </span><span class="n">time</span><span class="p">(</span><span class="nb">NULL</span><span class="p">),</span><span class="w"> </span><span class="n">time</span><span class="p">(</span><span class="nb">NULL</span><span class="p">));</span>
<span class="k">if</span><span class="w"> </span><span class="p">(</span><span class="n">hr</span><span class="w"> </span><span class="o">&amp;</span><span class="w"> </span><span class="n">HealthServiceAccessibilityMaskAvailable</span><span class="p">)</span><span class="w"> </span><span class="p">{</span>
<span class="w">  </span><span class="n">HealthValue</span><span class="w"> </span><span class="n">val</span><span class="w"> </span><span class="o">=</span><span class="w"> </span><span class="n">health_service_peek_current_value</span><span class="p">(</span><span class="n">HealthMetricHeartRateRawBPM</span><span class="p">);</span>
<span class="w">  </span><span class="k">if</span><span class="p">(</span><span class="n">val</span><span class="w"> </span><span class="o">&gt;</span><span class="w"> </span><span class="mi">0</span><span class="p">)</span><span class="w"> </span><span class="p">{</span>
<span class="w">    </span><span class="c1">// Display raw HRM value</span>
<span class="w">    </span><span class="k">static</span><span class="w"> </span><span class="kt">char</span><span class="w"> </span><span class="n">s_hrm_buffer</span><span class="p">[</span><span class="mi">8</span><span class="p">];</span>
<span class="w">    </span><span class="n">snprintf</span><span class="p">(</span><span class="n">s_hrm_buffer</span><span class="p">,</span><span class="w"> </span><span class="k">sizeof</span><span class="p">(</span><span class="n">s_hrm_buffer</span><span class="p">),</span><span class="w"> </span><span class="s">"%lu BPM"</span><span class="p">,</span><span class="w"> </span><span class="p">(</span><span class="kt">uint32_t</span><span class="p">)</span><span class="n">val</span><span class="p">);</span>
<span class="w">    </span><span class="n">text_layer_set_text</span><span class="p">(</span><span class="n">s_hrm_layer</span><span class="p">,</span><span class="w"> </span><span class="n">s_hrm_buffer</span><span class="p">);</span>
<span class="w">  </span><span class="p">}</span>
<span class="p">}</span>
</pre></div><p>Find out more in the
<a href="/guides/events-and-services/hrm/"><em>Heart Rate Monitor API guide</em></a>.</p><h2 id="pebblekit-4-0" class="anchor">PebbleKit 4.0</h2><p>PebbleKit for <a href="https://github.com/pebble/pebble-ios-sdk/" title="" class="">iOS</a> and
<a href="https://github.com/pebble/pebble-android-sdk/" title="" class="">Android</a> facilitates
communication between Pebble watchapps and 3rd party companion phone apps.
Version 4.0 introduces a number of new features and bug fixes, including:</p>
<ul>
<li>Support for Pebble 2 <em>(required for iOS only)</em></li>
<li>Removal of Bluetooth Classic (iOS)</li>
<li>Sports API - Support 3rd party HRM</li>
<li>Sports API - Custom data field and label</li>
<li>Sports API - Helper object to simplify usage, and minimize updates via
Bluetooth</li>
</ul>
<p>For further information about the specific platform changes, view the full
<a href="https://github.com/pebble/pebble-ios-sdk/" title="" class="">iOS</a>, or
<a href="https://github.com/pebble/pebble-android-sdk/" title="" class="">Android</a> changelogs.</p><h2 id="ble-hrm-mode" class="anchor">BLE HRM Mode</h2><p>Ever wanted to use your <em>Pebble 2 HRM</em> as a dedicated BLE HRM device with your
favourite mobile fitness app? Well now you can! Firmware 4.3 now implements the
standard
<a href="https://www.bluetooth.org/docman/handlers/downloaddoc.ashx?doc_id=239866" title="" class="">Bluetooth Heart Rate Service profile</a>.
In order to enable this profile, users must enable &#39;Pebble Health&#39;, then enable
&#39;Heart Rate Monitoring&#39; within the <code>Pebble Health</code> settings within the Pebble
mobile app.</p><p>Developers who are looking to integrate directly with this profile should be
aware of the following:</p><p>The Heart Rate Service UUID will be present in the advertising payload of
Pebble, but you must open the Bluetooth settings on the Pebble to make it
advertise and be discoverable over Bluetooth.</p><p>Because it&#39;s highly likely that the Pebble is already connected to the phone, it
will not be advertising. Therefore, we recommend that your mobile app also
enumerates already connected devices, to see if any of them support the Heart
Rate Service. This is in addition to scanning for advertisements to find new
devices that support HRS. By enumerating connected devices, you improve the user
experience: users will not have to go into the Bluetooth settings menu on Pebble
if their Pebble is already connected to the phone.</p><p>The first time an application subscribes to the Heart Rate Measurement
characteristic, a UI prompt will appear on the Pebble, asking the user to allow
sharing of their heart rate data. This permission is stored for the duration of
the Bluetooth connection.</p><p>When HR data sharing is active, the HR sensor will run continuously at ~1Hz
sample rate. This means there is a significant battery impact when using this
feature for an extended period of time.</p><p>When all applications have unsubscribed from the Heart Rate Measurement
characteristic, the HR sensor automatically returns to its default state.</p><p>Mobile apps should unsubscribe from the Heart Rate Measurement characteristic as
soon as the data is no longer required. For example, a workout app should
unsubscribe when the workout has finished and/or the application is exited.</p><p>If the Heart Rate Service is used continuously for a prolonged period of time
(currently 4hrs), a notification is presented on the watch to remind the user
that the HR data is still being shared.</p><p>The user can stop sharing HRM data from <em>Settings &gt; Bluetooth &gt; Device</em>. If the
user chooses to stop sharing, the Bluetooth connection is briefly disconnected
and reconnected to forcefully remove all subscribers. Unfortunately the
Bluetooth GATT specification does not provide a better mechanism for a service
to unsubscribe subscribers, only subscribers can unsubscribe themselves.</p><p>Service Characteristics Notes:</p>
<ul>
<li>&#39;Sensor Contact&#39; field is used.</li>
<li>&#39;Body Sensor&#39; characteristic is used. The value is constant though (It will
read &quot;Wrist&quot; / 0x02)</li>
<li>&#39;RR Interval&#39; is currently NOT used.</li>
<li>&#39;Energy Expended&#39; field is currently NOT used.</li>
<li>&#39;Heart Rate Control Point&#39; characteristic is currently NOT used.</li>
</ul>
<h2 id="what-39-s-next" class="anchor">What&#39;s Next</h2><p>Check out the <a href="/jp_manual/sdk/changelogs/4.3/" title="" class="">release notes</a> for a full list of
changes and fixes that were included in SDK 4.3.</p><p>Let us know on <a href="https://twitter.com/pebble/" title="" class="">Twitter</a> if you built something
cool using the new APIs! We&#39;d love to hear about your experiences with the SDK.</p><p>Happy Hacking!</p><p>Team Pebble</p>]]></content>
  </entry>
  
  <entry>
    <title type="html"><![CDATA[4.2-beta4 SDK - Emery Edition!]]></title>
    <link href="http://pebble.lunarians.net/blog/2016/10/11/Emery-SDK-Beta/"/>
    <updated>2016-10-11T00:00:00+00:00</updated>
    <id>http://pebble.lunarians.net/blog/2016/10/11/Emery-SDK-Beta</id>
    <content type="html"><![CDATA[<p>We&#39;re incredibly excited to announce the first public beta of the Pebble SDK
4.2. This is the first time that developers can experience the new &#39;Emery&#39;
platform which is specifically created for the upcoming
<a href="https://www.pebble.com/buy-pebble-time-2-smartwatch" title="" class="">Pebble Time 2</a>.</p><p><img src="/assets/images/blog/2016-10-11-intro.jpg" alt="Pebble Time 2" /></p><h2 id="all-about-those-pixels" class="anchor">All About Those Pixels</h2><p>The new display on the <em>Pebble Time 2</em> is almost 53% physically larger, and the
<a href="https://en.wikipedia.org/wiki/Pixel_density" title="" class="">Pixels per inch</a> (PPI) has been
increased from 182 PPI to 202 PPI. This is a massive 200x228 pixels, compared to
144x168 on the <em>Pebble Time Steel</em>, that&#39;s an 88% increase in the total amount
of pixels!.</p><p>Take a look at our
<a href="/guides/tools-and-resources/hardware-information/"><em>Hardware guide</em></a> for
further information about the specifications of the Pebble Time 2.</p><p>Watchfaces and watchapps that have not been updated for the Emery platform will
run in <em>Bezel Mode</em>. This means they will appear centered on screen at their
original resolution (144x168), but due to the change in PPI, they appear
slightly smaller.</p><p><img src="/assets/images/blog/2016-10-11-bezel.png" alt="Pebble Time 2 Bezel" />
<p class="blog__image-text">Left: Pebble Time Steel, Middle: Pebble Time 2 -
Bezel Mode, Right: Optimized for Pebble Time 2.<br />
<a href="https://github.com/pebble-examples/concentricity">Concentricity
Watchface</a></p></p><p>The increased number of pixels would immediately make you think that you can
just add more elements to your watchface design, but due to the increase in PPI,
existing elements and fonts may feel slightly smaller than expected when viewed
on an actual device.</p><p>The image below simulates how the PPI difference makes a bezel mode application
feel smaller on the Pebble Time 2.</p><p><img src="/assets/images/blog/2016-10-11-dpi-comparison.png" alt="Pebble Time 2 PPI" />
<p class="blog__image-text">Left: Pebble Time Steel, Right: Pebble Time 2 - Bezel Mode.</p></p><p>We&#39;ve now seen that the increased amount of pixels doesn&#39;t necessarily equate to
bigger text on our devices, due to the change in PPI, that&#39;s why we&#39;ve created
the new <a href="/jp_manual/docs/c/preview/User_Interface/Preferences/#preferred_content_size" title="" class="">ContentSize</a>
API.</p><h2 id="introducing-the-contentsize-api" class="anchor">Introducing the ContentSize API</h2><p>All existing Pebble smartwatches provide the ability for users to change the
size of text for notifications and some system UI components using <em>Settings &gt;
Notifications &gt; Text Size</em>.</p><p>The new
<a href="/jp_manual/docs/c/preview/User_Interface/Preferences/#preferred_content_size" title="" class="">ContentSize</a>
API now exposes this setting to developers, in order for
them to adapt their application design and layout based on this user preference.</p><p>In the previous section, we saw how the PPI increase on Pebble Time 2 affected
the relative size of a watchface. In the image below you can see precisely how
text sizes are affected by the PPI change.</p><p><img src="/assets/images/blog/2016-10-11-contentsize.png" alt="Pebble Time 2 ContentSize" />
<p class="blog__image-text">Yellow: Pebble Time Steel, Green: Pebble Time 2.</p></p><p>To negate the effects of this reduced font size, the Emery platform uses larger
fonts by default. Developers can use the
<a href="/jp_manual/docs/c/preview/User_Interface/Preferences/#preferred_content_size" title="" class="">ContentSize</a>
API to match this
behaviour within their own applications.</p><p>The following table explains how the text size setting affects the content size
on each platform:</p>
<table><thead>
<tr>
<th>Platform</th>
<th>Text Size: Small</th>
<th>Text Size: Medium</th>
<th>Text Size: Large</th>
</tr>
</thead><tbody>
<tr>
<td>Aplite, Basalt, Chalk, Diorite</td>
<td>ContentSize: Small</td>
<td>ContentSize: Medium</td>
<td>ContentSize: Large</td>
</tr>
<tr>
<td>Emery</td>
<td>ContentSize: Medium</td>
<td>ContentSize: Large</td>
<td>ContentSize: Extra Large</td>
</tr>
</tbody></table>
<p>Developers should aim to implement designs which adapt to the capabilities of
the device, but also the accessibility requirements of the user. The
<a href="/jp_manual/docs/c/preview/User_Interface/Preferences/#preferred_content_size" title="" class="">ContentSize</a>
API satisfies both of these goals.</p><p>For more information, read the
<a href="/guides/user-interfaces/content-size/"><em>ContentSize guide</em></a>.</p><h2 id="new-for-rocky-js" class="anchor">New for Rocky.js</h2><p>With the release of SDK 4.2, we&#39;re extremely proud to announce that
<a href="/jp_manual/docs/rockyjs/" title="" class="">Rocky.js</a> watchfaces can be published into the Pebble appstore!
As usual, don&#39;t publish apps with the beta SDK into the appstore, please wait
for the final release.</p><p>In addition to finalizing the memory contract for Rocky.js apps, we&#39;ve also
added a few new APIs to work with:</p><h3 id="memory-pressure" class="anchor">Memory Pressure</h3><p>The <code>memorypressure</code> event has been added to allow developers to handle the
situations which occur when the amount of memory available to their application
has changed. Initially we&#39;ve only implemented the <code>high</code> memory pressure level,
which occurs right before your application is about to be terminated, due to a
lack of memory. If you can free sufficient memory within the callback for this
event, your application will continue to run. Please refer to the Rocky.js
<a href="/jp_manual/docs/rockyjs/rocky/#RockyMemoryPressureCallback" title="" class="">documentation</a> and the memory
pressure <a href="https://github.com/pebble-examples/rocky-memorypressure" title="" class="">example application</a>.</p><h3 id="userpreferences" class="anchor">UserPreferences</h3><p>The first watchface setting exposed in the new <code>UserPreferences</code> object is
<code>contentSize</code>. This exposes the new
<a href="/jp_manual/docs/c/preview/User_Interface/Preferences/#preferred_content_size" title="" class="">ContentSize</a>
API to Rocky.js watchface
developers. Find out more in the Rocky.js
<a href="/jp_manual/docs/rockyjs/rocky/#userPreferences" title="" class="">UserPreferences documentation</a>.</p><h2 id="what-39-s-next" class="anchor">What&#39;s Next</h2><p>Check out the <a href="/jp_manual/sdk/changelogs/4.2-beta4/" title="" class="">release notes</a> for a full list of
changes and fixes that were included in SDK 4.2-beta4.</p><p>Let us know on <a href="https://twitter.com/pebble/" title="" class="">Twitter</a> if you built something
cool using the new APIs! We&#39;d love to hear about your experiences with the SDK.</p><p>Happy Hacking!</p><p>Team Pebble</p>]]></content>
  </entry>
  
  <entry>
    <title type="html"><![CDATA[Ready for Pebble 2]]></title>
    <link href="http://pebble.lunarians.net/blog/2016/10/04/ready-for-pebble-2/"/>
    <updated>2016-10-04T00:00:00+00:00</updated>
    <id>http://pebble.lunarians.net/blog/2016/10/04/ready-for-pebble-2</id>
    <content type="html"><![CDATA[<p>The latest 4.1 releases of the firmware, mobile apps and SDK bring support for
the new Pebble 2 smartwatches, which have started appearing on the wrists of
developers and reviewers around the globe.</p><p><img src="/assets/images/blog/2016-09-27-silk-in-the-wild.jpg" alt="Pebble 2 in the Wild" /></p><p>Pebble 2 smartwatches are on their way to Kickstarter backers, and firmware 4.1
will be ready and waiting for them.</p><h2 id="heart-rate-monitor-api" class="anchor">Heart Rate Monitor API</h2><p>The HRM APIs allow allow developers to query the user&#39;s current and historical
heart rates. We&#39;ve provided a simple to use API which caters for the most common
use-cases.</p><p><img src="/assets/images/blog/2016-09-27-heart-beat.gif" alt="HRM" class="pebble-screenshot pebble-screenshot--pebble2-black-lime" /></p><p>Find out more in the
<a href="/guides/events-and-services/hrm/"><em>Heart Rate Monitor API guide</em></a>.</p><h2 id="appglance-rest-api" class="anchor">AppGlance REST API</h2><p>The AppGlance REST API enables developers to programmatically set the icon and
subtitle that appears alongside their app in the launcher. Developers can push
slices to the their app&#39;s glance using their own backend servers by sending
HTTPS requests to the timeline endpoint.</p><p><img src="/assets/images/blog/2016-05-24-kickstarter-3/launcher.gif" alt="HRM" class="pebble-screenshot pebble-screenshot--pebble2-white-teal" /></p><p>Find out more about <code>App Glance</code> in the SDK documentation, or read the
<a href="/guides/user-interfaces/appglance-rest/"><em>AppGlance REST API guide</em></a>.</p><h2 id="what-39-s-next" class="anchor">What&#39;s Next</h2><p>Check out the <a href="/jp_manual/sdk/changelogs/4.1/" title="" class="">release notes</a> for a full list of changes
and fixes that were included in SDK 4.1.</p><p>Let us know on <a href="https://twitter.com/pebble/" title="" class="">Twitter</a> if you built something
cool using the new APIs! We&#39;d love to hear about your experiences with the SDK.</p><p>Happy Hacking!</p><p>Team Pebble</p>]]></content>
  </entry>
  
  <entry>
    <title type="html"><![CDATA[Timeline - The Future of the Past!]]></title>
    <link href="http://pebble.lunarians.net/blog/2016/09/06/timeline-the-future-of-the-past/"/>
    <updated>2016-09-06T00:00:00+00:00</updated>
    <id>http://pebble.lunarians.net/blog/2016/09/06/timeline-the-future-of-the-past</id>
    <content type="html"><![CDATA[<p>If you’ve been living under a rock, or have just been sunning yourself on the
beach for the past week, you might have missed the
<a href="/jp_manual/blog/2016/08/30/announcing-pebble-sdk4/" title="" class="">launch of Pebble OS 4.0</a>. This new
version introduced some fantastic new features, such as the
<a href="https://blog.getpebble.com/2016/08/30/fw4-0/" title="" class="">updated health app</a>,
<a href="/guides/user-interfaces/unobstructed-area/"><em>timeline quick view</em></a>,
<a href="/guides/user-interfaces/appglance-c/"><em>app glances</em></a>,
<a href="/jp_manual/blog/2016/08/15/introducing-rockyjs-watchfaces/" title="" class="">Rocky.js</a> and a new
<a href="/jp_manual/blog/2016/08/19/prime-time-is-approaching-for-os-4.0/#menu-icon-in-the-launcher" title="" class="">system launcher</a>.</p><h3 id="the-past-and-the-furious" class="anchor">The Past and the Furious</h3><p>However, there was one change which was met with mixed feedback from both users
and developers alike, the removal of timeline past. Previously accessible via
the UP button, timeline past was removed as part of the new 4.0 user
experience (UX). In 4.0 we introduced new APIs to give developers more options
to improve their application’s UX and potentially shift away from using the past
for interactions</p><p>Unfortunately, this change prevented users from accessing any timeline pin which
wasn’t in the present or future, negatively affecting a number of apps and their
use cases for the timeline.</p><p>We carefully listened to feedback and suggestions from our developer community
via the <a href="https://forums.pebble.com" title="" class="">forums</a>,
<a href="https://www.reddit.com/r/pebble" title="" class="">Reddit</a>,
<a href="https://twitter.com/pebbledev" title="" class="">Twitter</a> and
<a href="https://discordapp.com/invite/aRUAYFN" title="" class="">Discord</a>, and we are happy to announce that timeline past
has returned in the v4.0.1 update. Users who need to access the timeline past
can now assign it to one of their quick launch buttons.</p><p><img src="/assets/images/blog/2016-09-06-quick-launch.gif" alt="Quick Launch" class="pebble-screenshot pebble-screenshot--time-red" /></p><p>And so, with the reintroduction of timeline past, balanced was restored, and
that was the end of the story. Or was it?</p><h3 id="back-to-the-future" class="anchor">Back to the Future!</h3><p>If you’re the developer of an application which relies upon timeline past, you
will probably want to inform your users about how they can access timeline past,
as it will not be enabled by default. Fortunately, there are multiple ways in
which you can do this easily.</p><h4 id="1-app-store-description" class="anchor">1. App Store Description</h4><p>Use the app store description of your app to explain that your application
utilizes timeline past and that users will need to assign it to quick launch.
For example:</p>
<blockquote>
<p>This application utilizes pins in the timeline past. On your Pebble, go to
‘Settings’, ‘Quick Launch’, ‘Up Button’, then select ‘Timeline Past’. You can
then access timeline past by long pressing UP.</p></blockquote>
<h4 id="2-display-a-splash-screen" class="anchor">2. Display a Splash Screen</h4><p>Add a splash screen to your application which only runs once, and display a
message informing users how to enable timeline past. You could use the
‘<a href="https://www.npmjs.com/package/@smallstoneapps/about-window" title="" class="">about-window</a>’
Pebble package for a really quick and easy solution.</p><p><img src="/assets/images/blog/2016-09-06-about-window.png" alt="About Window" class="pebble-screenshot pebble-screenshot--time-white" /></p><h4 id="3-display-a-one-time-notification" class="anchor">3. Display a One-Time Notification</h4><p>Display a
<a href="https://developer.pebble.com/guides/communication/using-pebblekit-js/#showing-a-notification" title="" class="">system notification</a>
which only fires once, and display a message informing users how to enable
timeline past.</p><p><img src="/assets/images/blog/2016-09-06-system-notification.png" alt="System Notification" class="pebble-screenshot pebble-screenshot--time-black" /></p><h4 id="4-display-a-timeline-notification" class="anchor">4. Display a Timeline Notification</h4><p>Display a
<a href="https://developer.pebble.com/guides/pebble-timeline/" title="" class="">timeline notification</a>,
and display a message informing users how to enable timeline past.</p><p><img src="/assets/images/blog/2016-09-06-timeline-notification.png" alt="Timeline Notification" class="pebble-screenshot pebble-screenshot--time-red" /></p><h3 id="the-future-of-the-past" class="anchor">The Future of the Past</h3><p>For now, developers can continue to utilize timeline past, but over time we
would like to provide a more diverse set of functionality that allows developers
to surface information to their users. For example, some use cases of timeline
past may be more appropriate as using an app glance, or timeline quick view
instead.</p><h3 id="were-listening" class="anchor">We’re Listening!</h3><p>Your feedback is incredibly important to us, it’s how we keep making awesome
things. We love to receive your product and feature
<a href="http://pbl.io/ideas" title="" class="">suggestions</a> too.</p><p>We’re particularly interested to hear about your use cases and ideas for
timeline as we travel further into the future! Let us know via
<a href="https://forums.pebble.com" title="" class="">the forums</a>,
<a href="https://twitter.com/pebbledev" title="" class="">Twitter</a> and <a href="https://discordapp.com/invite/aRUAYFN" title="" class="">Discord</a>!</p>]]></content>
  </entry>
  
  <entry>
    <title type="html"><![CDATA[Announcing Pebble SDK 4.0]]></title>
    <link href="http://pebble.lunarians.net/blog/2016/08/30/announcing-pebble-sdk4/"/>
    <updated>2016-08-30T00:00:00+00:00</updated>
    <id>http://pebble.lunarians.net/blog/2016/08/30/announcing-pebble-sdk4</id>
    <content type="html"><![CDATA[<p>Today we have the pleasure of announcing the release of Pebble SDK 4.0. We have
published an updated version of the Pebble Tool, the SDK itself, and we&#39;ve
deployed 4.0 onto <a href="" title="" class="">CloudPebble</a>. It&#39;s time to get
busy!</p><h2 id="what-39-s-new" class="anchor">What&#39;s New</h2><p>Pebble OS 4.0 has been released and users with Pebble Time, Pebble Time Steel
and Pebble Time Round will be receiving the update today.</p><p>We covered the new features in detail
<a href="/jp_manual/blog/2016/08/19/prime-time-is-approaching-for-os-4.0/" title="" class="">very recently</a>, but
let&#39;s have a quick reminder of the new APIs and functionality that&#39;s included.</p><h3 id="rocky-js" class="anchor">Rocky.js</h3><p>Javascript on the freakin&#39; watch! Although still in beta,
<a href="/jp_manual/docs/rockyjs/" title="" class="">Rocky.js</a> lets you start developing watchfaces in JavaScript
using standard Web APIs, which you can then run directly on your watch. It&#39;s an
embedded JavaScript revolution!</p><p>Read the updated
<a href="/jp_manual/blog/2016/08/15/introducing-rockyjs-watchfaces/" title="" class="">Rocky.js blog post</a>
to get started.</p><h3 id="timeline-quick-view" class="anchor">Timeline Quick View</h3><p>Timeline Quick View displays upcoming information from your timeline on your
watchface. We introduced the <code>UnobstructedArea</code> API to allow developers to
detect if the screen is being obstructed by a system modal, such as Timeline
Quick View. Developers can use this new API to adapt their watchface layout
according to the available screen real estate.</p><p>Read the <a href="/guides/user-interfaces/unobstructed-area/"><em>UnobstructedArea guide</em></a>
to get started.</p><h3 id="appglances" class="anchor">AppGlances</h3><p>With the new <code>AppGlance</code> API, developers can dynamically change the icon and
subtitle of their watchapp within the system launcher, at runtime. This allows
developers to provide meaningful feedback to users without the need for their
application to be launched.</p><p>Read the
<a href="/guides/user-interfaces/appglance-c/"><em>AppGlance C guide</em></a> and the
<a href="/guides/user-interfaces/appglance-pebblekit-js/"><em>AppGlance PebbleKit JS guide</em></a>
to get started.</p><h3 id="diorite-platform" class="anchor">Diorite Platform</h3><p>The new Pebble 2 devices use apps built for the Diorite platform, so you&#39;ll need
SDK 4.0 to develop applications which target those devices.</p><p>Take a look at the
<a href="/guides/tools-and-resources/hardware-information/"><em>Hardware Information guide</em></a>
to find out about the capabilities of the Pebble 2.</p><h3 id="one-click-action-application" class="anchor">One Click Action application</h3><p>The One Click Action application pattern promotes a type of watchapp which
serves a single purpose. It launches, performs an action, and then terminates.
This pattern utilizes the new <code>AppGlance</code> and <code>AppExitReason</code> APIs.</p><p>Take a look at the
<a href="/guides/design-and-interaction/one-click-actions/"><em>One Click Actions guide</em></a>
to get started.</p><h2 id="dude-where-39-s-my-hrm-api" class="anchor">Dude, Where&#39;s my HRM API?</h2><p>We had planned on shipping the Heart Rate API with 4.0, but it&#39;s been pushed
back into 4.1 so that we can add even more awesomeness. Pebble 2 devices will
begin to appear on wrists after firmware 4.1 ships, so you&#39;ll still have time to
begin implementing HRM data into your watchapps and watchfaces. We will announce
details of the HRM API as soon as it&#39;s available.</p><h2 id="what-39-s-next" class="anchor">What&#39;s Next</h2><p>Please remember that we will promote watchfaces and watchapps that make use of
these new 4.0 APIs if you submit them to the appstore <strong>from August 31st
onwards</strong>.</p><p>Let us know on <a href="https://twitter.com/pebble/" title="" class="">Twitter</a> if you build something
cool using the new APIs! We&#39;d love to hear about your experiences with the SDK.</p><p>Happy Hacking!</p><p>Team Pebble</p>]]></content>
  </entry>
  
  <entry>
    <title type="html"><![CDATA[Prime Time is Approaching for OS 4.0]]></title>
    <link href="http://pebble.lunarians.net/blog/2016/08/19/prime-time-is-approaching-for-os-4.0/"/>
    <updated>2016-08-19T00:00:00+00:00</updated>
    <id>http://pebble.lunarians.net/blog/2016/08/19/prime-time-is-approaching-for-os-4.0</id>
    <content type="html"><![CDATA[<p>Pebble developers of the world unite! Pebble OS 4.0 is just around the corner
and it&#39;s now time to put those finishing touches on your projects, and prepare
them for publishing!</p><p>Pebble Time owners will be receiving OS 4.0 before Kickstarter backers receive
their Pebble 2 watches, so we&#39;re recommending that developers publish their
4.0 watchapps and watchfaces into the appstore <strong>from August 31st onwards</strong>.</p><p>We&#39;ll be promoting new and updated apps which utilize the new SDK 4.0 APIs and
features by creating a brand new category in the appstore called
&#39;Optimized for 4.0&#39;. This is your time to shine!</p><p>If you haven&#39;t even begun to prepare for 4.0, there are some really quick wins
you can use to your advantage.</p><h2 id="menu-icon-in-the-launcher" class="anchor">Menu Icon in the Launcher</h2><p>The new launcher in 4.0 allows developers to provide a custom icon for
their watchapps and watchfaces.</p>
<div class="pebble-dual-image">
  <div class="panel">
  <p>  <img src="/assets/images/blog/2016-08-19-pikachu-icon.png" alt="Launcher Icon" /></p>
  </div>
  <div class="panel">
  <p>  <img src="/assets/images/blog/2016-08-19-pikachu-launcher.png" alt="Launcher" class="pebble-screenshot pebble-screenshot--time-red" /></p>
  </div>
</div>

<blockquote>
<p>If your <code>png</code> file is color, we will use the luminance of the image to add
some subtle gray when rendering it in the launcher, rather than just black
and white. Transparency will be preserved.</p></blockquote>
<p>You should add a 25x25 <code>png</code> to the <code>resources.media</code> section of the
<code>package.json</code> file, and set <code>&quot;menuIcon&quot;: true</code>.
Please note that icons that are larger will be ignored and 
your app will have the default icon instead.</p><div class="highlight"><pre><span></span><span class="s2">"resources"</span><span class="o">:</span><span class="w"> </span><span class="p">{</span>
<span class="w">  </span><span class="s2">"media"</span><span class="o">:</span><span class="w"> </span><span class="p">[</span>
<span class="w">    </span><span class="p">{</span>
<span class="w">      </span><span class="s2">"menuIcon"</span><span class="o">:</span><span class="w"> </span><span class="kc">true</span><span class="p">,</span>
<span class="w">      </span><span class="s2">"type"</span><span class="o">:</span><span class="w"> </span><span class="s2">"png"</span><span class="p">,</span>
<span class="w">      </span><span class="s2">"name"</span><span class="o">:</span><span class="w"> </span><span class="s2">"IMAGE_MENU_ICON"</span><span class="p">,</span>
<span class="w">      </span><span class="s2">"file"</span><span class="o">:</span><span class="w"> </span><span class="s2">"images/icon.png"</span>
<span class="w">    </span><span class="p">}</span>
<span class="w">  </span><span class="p">]</span>
<span class="p">}</span>
</pre></div><h2 id="timeline-quick-view" class="anchor">Timeline Quick View</h2><p>This new feature really brings your timeline into the present, with your
next appointment appearing as a modal notification over the active watchface.</p><p>We introduced the <code>UnobstructedArea</code> API in 4.0 to allow developers to detect
if the screen is being obstructed by a system modal. Below you can see two
examples of the Simplicity watchface. The Pebble on the left is not using the
<code>UnobstructedArea</code> API, and the Pebble on the right is.</p>
<div class="pebble-dual-image">
  <div class="panel">
  <p>  <img src="/assets/images/blog/2016-08-19-simplicity-std.png" alt="Simplicity" class="pebble-screenshot pebble-screenshot--time-white" /></p>
  <p class="blog__image-text">Watchface not updated</p>
  </div>
  <div class="panel">
  <p>  <img src="/assets/images/blog/2016-08-19-simplicity-qv.png" alt="Simplicity" class="pebble-screenshot pebble-screenshot--time-white" /></p>
  <p class="blog__image-text">Respects new 4.0 unobstructed area</p>
  </div>
</div>
<p>You can detect changes to the available screen real-estate and then move, scale,
or hide their layers to achieve an optimal layout while the screen is partially
obscured. This provides a fantastic experience to your users.</p><p>There&#39;s <a href="/guides/user-interfaces/unobstructed-area/"><em>a dedicated guide</em></a>
which goes into more detail about the <code>UnobstructedArea</code> API, it contains
examples and links to sample implementations.</p><h2 id="appglances" class="anchor">AppGlances</h2><p>While your static app icon and app title from the <code>package.json</code> are being used as the 
default to present your app to the user,
<em>AppGlances</em> allow developers to control this content at runtime and
to provide meaningful feedback to users directly from the new launcher. 
The API exposes the ability to dynamically change
the <code>icon</code> and <code>subtitle_template_string</code> text of your application in the
launcher.</p><p><img src="/assets/images/blog/2016-05-24-kickstarter-3/launcher.gif"
alt="Updated Launcher" class="pebble-screenshot pebble-screenshot--time-black">
<p class="blog__image-text">Preview version of 4.0 launcher</p></p><p>Utilizing the <code>App Glance</code> API doesn&#39;t need to be difficult. We&#39;ve provided
guides, examples and sample applications for using the
<a href="/guides/user-interfaces/appglance-c/"><em>AppGlance C API</em></a> and the
<a href="/guides/user-interfaces/appglance-pebblekit-js/"><em>AppGlance PebbleKit JS API</em></a>.</p><h2 id="the-diorite-platform" class="anchor">The Diorite Platform</h2><p>The Diorite platform was created for the new Pebble 2 devices. Its display is
rectangular, 144x168 pixels, with 2 colors (black and white). It has a
microphone and heart rate monitor, but it doesn&#39;t have a compass. If your app
works with Aplite it will already work with Diorite, but there are some important considerations to note:</p>
<ul>
<li>If you chose to limit your app to some platforms, you need to add <code>&quot;diorite&quot;</code> to your <code>targetPlatforms</code> in the <code>package.json</code>.</li>
<li>Check for the appropriate usage of
<a href="/guides/best-practices/building-for-every-pebble/#available-defines-and-macros"><em>compiler directives</em></a>.</li>
</ul>
<p>In general, it&#39;s better to use capability and feature detection, rather than platform
detection. For example, when dealing with resources, use the suffix <code>~bw</code> instead of <code>~aplite</code> so they are picked on all black and white platforms.</p><h2 id="what-39-s-next" class="anchor">What&#39;s Next</h2><p>We&#39;re really excited for the release of Pebble OS 4.0 and the new features it
brings. It&#39;s now time for you to take advantage of the new APIs and
enhance your existing projects, or even create entirely new ones!</p><p>Why not build something like the
<a href="/guides/design-and-interaction/one-click-actions/"><em>One Click Action</em></a>
application, which utilizes the new <code>App Glance</code> and <code>AppExitReason</code> APIs.</p><p>Please remember that we will promote watchfaces and watchapps
that make use of these new 4.0 APIs if you
submit them to the appstore <strong>from August 31st onwards</strong>.</p><p>Let us know on <a href="https://twitter.com/pebbledev" title="" class="">Twitter</a> if you build something
cool using the new APIs! We&#39;d love to hear about your experiences with the SDK.</p><p>Happy Hacking!</p><p>Team Pebble</p>]]></content>
  </entry>
  
  <entry>
    <title type="html"><![CDATA[Introducing Rocky.js Watchfaces!]]></title>
    <link href="http://pebble.lunarians.net/blog/2016/08/15/introducing-rockyjs-watchfaces/"/>
    <updated>2016-08-15T00:00:00+00:00</updated>
    <id>http://pebble.lunarians.net/blog/2016/08/15/introducing-rockyjs-watchfaces</id>
    <content type="html"><![CDATA[<p>We&#39;re incredibly excited and proud to announce the first public beta version of
Rocky.js watchfaces for Pebble. Rocky.js is ECMAScript 5.1 JavaScript running
natively on Pebble smartwatches, thanks to
<a href="https://github.com/Samsung/jerryscript/wiki/JerryScriptWorkshopApril2016" title="" class="">our collaboration</a>
with <a href="https://github.com/pebble/jerryscript" title="" class="">JerryScript</a>. This is an incredible
feat of engineering!</p><h2 id="it-39-s-javascript-on-the-freakin-39-watch" class="anchor">It&#39;s JavaScript on the freakin&#39; watch!</h2><div class="highlight"><pre><span></span><span class="kd">var</span><span class="w"> </span><span class="nx">rocky</span><span class="w"> </span><span class="o">=</span><span class="w"> </span><span class="nx">require</span><span class="p">(</span><span class="s1">'rocky'</span><span class="p">);</span>

<span class="nx">rocky</span><span class="p">.</span><span class="nx">on</span><span class="p">(</span><span class="s1">'minutechange'</span><span class="p">,</span><span class="w"> </span><span class="kd">function</span><span class="p">(</span><span class="nx">event</span><span class="p">)</span><span class="w"> </span><span class="p">{</span>
<span class="w">  </span><span class="nx">rocky</span><span class="p">.</span><span class="nx">requestDraw</span><span class="p">();</span>
<span class="p">});</span>

<span class="nx">rocky</span><span class="p">.</span><span class="nx">on</span><span class="p">(</span><span class="s1">'draw'</span><span class="p">,</span><span class="w"> </span><span class="kd">function</span><span class="p">(</span><span class="nx">event</span><span class="p">)</span><span class="w"> </span><span class="p">{</span>
<span class="w">  </span><span class="kd">var</span><span class="w"> </span><span class="nx">ctx</span><span class="w"> </span><span class="o">=</span><span class="w"> </span><span class="nx">event</span><span class="p">.</span><span class="nx">context</span><span class="p">;</span>
<span class="w">  </span><span class="nx">ctx</span><span class="p">.</span><span class="nx">clearRect</span><span class="p">(</span><span class="mf">0</span><span class="p">,</span><span class="w"> </span><span class="mf">0</span><span class="p">,</span><span class="w"> </span><span class="nx">ctx</span><span class="p">.</span><span class="nx">canvas</span><span class="p">.</span><span class="nx">clientWidth</span><span class="p">,</span><span class="w"> </span><span class="nx">ctx</span><span class="p">.</span><span class="nx">canvas</span><span class="p">.</span><span class="nx">clientHeight</span><span class="p">);</span>
<span class="w">  </span><span class="nx">ctx</span><span class="p">.</span><span class="nx">fillStyle</span><span class="w"> </span><span class="o">=</span><span class="w"> </span><span class="s1">'white'</span><span class="p">;</span>
<span class="w">  </span><span class="nx">ctx</span><span class="p">.</span><span class="nx">textAlign</span><span class="w"> </span><span class="o">=</span><span class="w"> </span><span class="s1">'center'</span><span class="p">;</span>

<span class="w">  </span><span class="kd">var</span><span class="w"> </span><span class="nx">w</span><span class="w"> </span><span class="o">=</span><span class="w"> </span><span class="nx">ctx</span><span class="p">.</span><span class="nx">canvas</span><span class="p">.</span><span class="nx">unobstructedWidth</span><span class="p">;</span>
<span class="w">  </span><span class="kd">var</span><span class="w"> </span><span class="nx">h</span><span class="w"> </span><span class="o">=</span><span class="w"> </span><span class="nx">ctx</span><span class="p">.</span><span class="nx">canvas</span><span class="p">.</span><span class="nx">unobstructedHeight</span><span class="p">;</span>
<span class="w">  </span><span class="nx">ctx</span><span class="p">.</span><span class="nx">fillText</span><span class="p">(</span><span class="s1">'JavaScript\non the watch!'</span><span class="p">,</span><span class="w"> </span><span class="nx">w</span><span class="w"> </span><span class="o">/</span><span class="w"> </span><span class="mf">2</span><span class="p">,</span><span class="w"> </span><span class="nx">h</span><span class="w"> </span><span class="o">/</span><span class="w"> </span><span class="mf">2</span><span class="p">);</span>
<span class="p">});</span>
</pre></div><p><img src="/assets/images/blog/2016-08-16-jotw.png" alt="Rocky" class="pebble-screenshot pebble-screenshot--time-red" /></p><p>Right now we&#39;re giving you early access to this game-changing environment to
create watchfaces entirely in JavaScript. Feel free to share your code, to
install it on the emulator and on your watch (with the upcoming firmware 4.0),
but please don&#39;t upload apps to the appstore as they will stop working in a
future release.</p>
<div class="alert alert--fg-white alert--bg-purple">
  <p>  <strong>Appstore Publishing</strong></p><p>  Rocky.js JavaScript watchfaces must not be published into the appstore at
  this time.</p>
</div>
<p>We can&#39;t wait to hear your feedback and see what amazing watchfaces you create!</p><p>Enough hype, let&#39;s dive into the eye of the tiger!</p><h2 id="rocky-js-projects" class="anchor">Rocky.js Projects</h2><p>Things are a little different in the JavaScript world, so let&#39;s take a closer
look at the structure of a Rocky.js project:</p><div class="highlight no-copy"><pre>package.json
src/rocky/index.js
src/pkjs/index.js
common/*.js
</pre></div><h4 id="package-json" class="anchor">package.json</h4><p>The format of the <code>package.json</code> file remains roughly the same as existing
Pebble projects, with some minor differences:</p>
<ul>
<li><code>&quot;projectType&quot;: &quot;rocky&quot;</code>.</li>
<li>Aplite <code>targetPlatform</code> is not supported.</li>
<li><code>resources</code> are not currently supported, but will consume space in your PBW if
specified.</li>
<li><code>messageKeys</code> are not permitted.</li>
</ul>
<h4 id="src-rocky-index-js" class="anchor">src/rocky/index.js</h4><p>This is now the main entry point into our application on the watch. This is
where our Rocky.js JavaScript code resides. All code within this file will be
executed on the smartwatch. Additional scripts may be placed in this folder, see
<a href="#additional-scripts" title="" class="">below</a>.</p><h4 id="src-pkjs-index-js" class="anchor">src/pkjs/index.js</h4><p>This file contains our <a href="/jp_manual/docs/pebblekit-js/" title="" class="">PebbleKit JS</a> (pkjs) JavaScript
code. This code will execute on the mobile device connected to the smartwatch.
Additional scripts may be placed in this folder, see
<a href="#additional-scripts" title="" class="">below</a>.</p><p>For Rocky.js projects only, we&#39;ve added a new simplified communication channel
<a href="/jp_manual/docs/rockyjs/rocky/#postMessage" title="" class=""><code>postMessage()</code></a> and
<a href="/jp_manual/docs/rockyjs/rocky/#on" title="" class=""><code>on(&#39;message&#39;, ...)</code></a> which allows you to send and
receive JavaScript JSON objects between the phone and smartwatch.</p><h4 id="additional-scripts" class="anchor">Additional Scripts</h4><p>Both the <code>rocky</code> and <code>pkjs</code> folders support the use of multiple .js files, which
helps to keep your code clean and modular. Use the
<a href="http://www.commonjs.org/specs/modules/1.0/" title="" class="">CommonJS Module</a> format for
your additional scripts, then <code>require()</code> them in your <code>index.js</code>.</p><div class="highlight"><pre><span></span><span class="c1">// file: src/rocky/additional.js</span>
<span class="kd">function</span><span class="w"> </span><span class="nx">test</span><span class="p">()</span><span class="w"> </span><span class="p">{</span>
<span class="w">  </span><span class="nx">console</span><span class="p">.</span><span class="nx">log</span><span class="p">(</span><span class="s1">'Additional File'</span><span class="p">);</span>
<span class="p">}</span>

<span class="nx">module</span><span class="p">.</span><span class="nx">exports</span><span class="p">.</span><span class="nx">test</span><span class="w"> </span><span class="o">=</span><span class="w"> </span><span class="nx">test</span><span class="p">;</span>
</pre></div><div class="highlight"><pre><span></span><span class="c1">// file: src/rocky/index.js</span>
<span class="kd">var</span><span class="w"> </span><span class="nx">additional</span><span class="w"> </span><span class="o">=</span><span class="w"> </span><span class="nx">require</span><span class="p">(</span><span class="s1">'./additional'</span><span class="p">);</span>
<span class="nx">additional</span><span class="p">.</span><span class="nx">test</span><span class="p">();</span>
</pre></div><h4 id="common-js" class="anchor">common/*.js</h4><p>If you need to share code between <code>rocky</code> and <code>pkjs</code>, you can create a <code>common</code>
folder, then add your JavaScript files.</p><div class="highlight"><pre><span></span><span class="c1">// file: src/common/shared.js</span>
<span class="kd">function</span><span class="w"> </span><span class="nx">test</span><span class="p">()</span><span class="w"> </span><span class="p">{</span>
<span class="w">  </span><span class="nx">console</span><span class="p">.</span><span class="nx">log</span><span class="p">(</span><span class="s1">'Hello from shared code'</span><span class="p">);</span>
<span class="p">}</span>

<span class="nx">module</span><span class="p">.</span><span class="nx">exports</span><span class="p">.</span><span class="nx">test</span><span class="w"> </span><span class="o">=</span><span class="w"> </span><span class="nx">test</span><span class="p">;</span>
</pre></div><div class="highlight"><pre><span></span><span class="c1">// file: src/rocky/index.js</span>
<span class="kd">var</span><span class="w"> </span><span class="nx">shared</span><span class="w"> </span><span class="o">=</span><span class="w"> </span><span class="nx">require</span><span class="p">(</span><span class="s1">'../common/shared'</span><span class="p">);</span>
<span class="nx">shared</span><span class="p">.</span><span class="nx">test</span><span class="p">();</span>
</pre></div><div class="highlight"><pre><span></span><span class="c1">// file: src/pkjs/index.js</span>
<span class="kd">var</span><span class="w"> </span><span class="nx">shared</span><span class="w"> </span><span class="o">=</span><span class="w"> </span><span class="nx">require</span><span class="p">(</span><span class="s1">'../common/shared'</span><span class="p">);</span>
<span class="nx">shared</span><span class="p">.</span><span class="nx">test</span><span class="p">();</span>
</pre></div><h2 id="available-apis" class="anchor">Available APIs</h2><p>In this initial release of Rocky.js, we have focused on the ability to create
watchfaces only. We will be adding more and more APIs as time progresses, and
we&#39;re determined for JavaScript to have feature parity with the rest of the
Pebble developer ecosystem.</p><p>We&#39;ve developed our API in-line with standard Web APIs, which may appear strange
to existing Pebble developers, but we&#39;re confident that this will facilitate
code re-use and provide a better experience overall.</p><h3 id="system-events" class="anchor">System Events</h3><p>We&#39;ve provided a series of events which every watchface will likely require, and
each of these events allow you to provide a callback method which is emitted
when the event occurs.</p><p>Existing Pebble developers will be familiar with the tick style events,
including:
<a href="/jp_manual/docs/rockyjs/rocky/#on" title="" class=""><code>secondchange</code></a>,
<a href="/jp_manual/docs/rockyjs/rocky/#on" title="" class=""><code>minutechange</code></a>,
<a href="/jp_manual/docs/rockyjs/rocky/#on" title="" class=""><code>hourchange</code></a> and
<a href="/jp_manual/docs/rockyjs/rocky/#on" title="" class=""><code>daychange</code></a>. By using these events, instead of
<a href="/jp_manual/docs/rockyjs" title="" class=""><code>setInterval</code></a>, we&#39;re automatically kept in sync with the wall
clock time.</p><p>We also have a
<a href="/jp_manual/docs/rockyjs/rocky/#on" title="" class=""><code>message</code></a> event for
receiving JavaScript JSON objects from the <code>pkjs</code> component, and a
<a href="/jp_manual/docs/rockyjs/rocky/#on" title="" class=""><code>draw</code></a> event which you&#39;ll use to control the screen
updates.</p><div class="highlight"><pre><span></span><span class="nx">rocky</span><span class="p">.</span><span class="nx">on</span><span class="p">(</span><span class="s1">'minutechange'</span><span class="p">,</span><span class="w"> </span><span class="kd">function</span><span class="p">(</span><span class="nx">event</span><span class="p">)</span><span class="w"> </span><span class="p">{</span>
<span class="w">  </span><span class="c1">// Request the screen to be redrawn on next pass</span>
<span class="w">  </span><span class="nx">rocky</span><span class="p">.</span><span class="nx">requestDraw</span><span class="p">();</span>
<span class="p">});</span>
</pre></div><h3 id="drawing-canvas" class="anchor">Drawing Canvas</h3><p>The canvas is a 2D rendering context and represents the display of the Pebble
smartwatch. We use the canvas context for drawing text and shapes. We&#39;re aiming
to support standard Web API methods and properties where possible, so the canvas
has been made available as a
<a href="/jp_manual/docs/rockyjs/CanvasRenderingContext2D/" title="" class="">CanvasRenderingContext2D</a>.</p>
<blockquote>
<p>Please note that the canvas isn&#39;t fully implemented yet, so certain methods
and properties are not available yet. We&#39;re still working on this, so expect
more in future updates!</p></blockquote>
<div class="highlight"><pre><span></span><span class="nx">rocky</span><span class="p">.</span><span class="nx">on</span><span class="p">(</span><span class="s1">'draw'</span><span class="p">,</span><span class="w"> </span><span class="kd">function</span><span class="p">(</span><span class="nx">event</span><span class="p">)</span><span class="w"> </span><span class="p">{</span>
<span class="w">  </span><span class="kd">var</span><span class="w"> </span><span class="nx">ctx</span><span class="w"> </span><span class="o">=</span><span class="w"> </span><span class="nx">event</span><span class="p">.</span><span class="nx">context</span><span class="p">;</span>

<span class="w">  </span><span class="nx">ctx</span><span class="p">.</span><span class="nx">fillStyle</span><span class="w"> </span><span class="o">=</span><span class="w"> </span><span class="s1">'red'</span><span class="p">;</span>
<span class="w">  </span><span class="nx">ctx</span><span class="p">.</span><span class="nx">textAlign</span><span class="w"> </span><span class="o">=</span><span class="w"> </span><span class="s1">'center'</span><span class="p">;</span>
<span class="w">  </span><span class="nx">ctx</span><span class="p">.</span><span class="nx">font</span><span class="w"> </span><span class="o">=</span><span class="w"> </span><span class="s1">'14px Gothic'</span><span class="p">;</span>

<span class="w">  </span><span class="kd">var</span><span class="w"> </span><span class="nx">w</span><span class="w"> </span><span class="o">=</span><span class="w"> </span><span class="nx">ctx</span><span class="p">.</span><span class="nx">canvas</span><span class="p">.</span><span class="nx">unobstructedWidth</span><span class="p">;</span>
<span class="w">  </span><span class="kd">var</span><span class="w"> </span><span class="nx">h</span><span class="w"> </span><span class="o">=</span><span class="w"> </span><span class="nx">ctx</span><span class="p">.</span><span class="nx">canvas</span><span class="p">.</span><span class="nx">unobstructedHeight</span><span class="p">;</span>
<span class="w">  </span><span class="nx">ctx</span><span class="p">.</span><span class="nx">fillText</span><span class="p">(</span><span class="s1">'Rocky.js Rocks!'</span><span class="p">,</span><span class="w"> </span><span class="nx">w</span><span class="w"> </span><span class="o">/</span><span class="w"> </span><span class="mf">2</span><span class="p">,</span><span class="w"> </span><span class="nx">h</span><span class="w"> </span><span class="o">/</span><span class="w"> </span><span class="mf">2</span><span class="p">);</span>
<span class="p">});</span>
</pre></div><h2 id="limitations" class="anchor">Limitations</h2><p>We are still in the early beta phase and there are some limitations and
restrictions that you need to be aware of:</p>
<ul>
<li>Don&#39;t publish Rocky.js watchfaces to the Pebble appstore yet, they will stop
working.</li>
<li>Rocky.js watchfaces only run on the 4.0 emulators/firmware. The 4.0 firmware
will be available soon for Basalt, Chalk and Diorite.</li>
<li>No support for custom fonts, images and other resources, yet.</li>
<li>No C code allowed.</li>
<li>No messageKeys.</li>
<li>There are file size and memory considerations with your Rocky.js projects.
If you include a large JS library, it probably won&#39;t work.</li>
</ul>
<h2 id="sdk-4-0" class="anchor">SDK 4.0</h2><p>We have published an updated version of
<a href="" title="" class="">CloudPebble</a> which now supports creating
Rocky.js watchfaces in JavaScript.</p><p>If you prefer our local tools, we&#39;ve also published everything you need to begin
creating Rocky.js watchfaces. Run the following command to install the Pebble
Tool and 4.0 SDK:</p><div class="highlight no-copy"><pre>$ brew upgrade pebble-sdk
$ pebble sdk install latest
</pre></div><h2 id="how-to-get-started" class="anchor">How to Get Started</h2><p>We created a <a href="/jp_manual/tutorials/js-watchface-tutorial/part1/" title="" class="">2-part tutorial</a> for
getting started with Rocky.js watchfaces. It explains everything you need to
know about creating digital and analog watchfaces, plus how to retrieve
weather conditions from the internet.</p><p>If you&#39;re looking for more detailed information, check out the
<a href="/jp_manual/docs/rockyjs" title="" class="">API Documentation</a>.</p><h2 id="sample-watchfaces" class="anchor">Sample Watchfaces</h2><p>We&#39;ve already created a few sample watchfaces:</p>
<ul>
<li><a href="https://github.com/pebble-examples/rocky-watchface-tutorial-part1" title="" class="">Tictoc</a> -
Simple analog watchface.</li>
<li><a href="https://github.com/pebble-examples/rocky-watchface-tutorial-part2" title="" class="">Tictoc Weather</a> -
Simple analog watchface with weather data from a REST API.</li>
<li><a href="https://github.com/orviwan/rocky-leco-weather" title="" class="">Leco with Weather</a> - Simple
digital watchface with weather data from a REST API.</li>
<li><a href="https://github.com/orviwan/rocky-leco-clay" title="" class="">Leco with Clay</a> - Simple analog
watchface which uses Clay for configurable settings.</li>
<li><a href="https://github.com/orviwan/simplicity-rockyjs" title="" class="">Simplicity</a> - Rocky.js version
of the classic Simplicity watchface.</li>
</ul>
<h2 id="feedback-and-help" class="anchor">Feedback and Help</h2><p>We hope you&#39;re as exicited about Rocky.js as we are. If you need assistance,
have feedback or just want to send us some love, we&#39;re in #rockyjs on
<a href="https://discordapp.com/invite/aRUAYFN" title="" class="">Discord</a> or the
<a href="https://forums.pebble.com/c/development" title="" class="">Pebble developer forums</a>.</p><p>We&#39;re already working on the next update of Rocky.js and your feedback will help
shape the future!</p>]]></content>
  </entry>
  
  <entry>
    <title type="html"><![CDATA[Creating Native Companion Apps with JS and Cordova]]></title>
    <link href="http://pebble.lunarians.net/blog/2016/07/01/creating-native-companion-apps-with-js-and-cordova/"/>
    <updated>2016-07-01T00:00:00+00:00</updated>
    <id>http://pebble.lunarians.net/blog/2016/07/01/creating-native-companion-apps-with-js-and-cordova</id>
    <content type="html"><![CDATA[<p>Creating companion apps using 
<a href="/jp_manual/guides/communication/using-pebblekit-android/" title="" class="">PebbleKit Android</a> and 
<a href="/jp_manual/guides/communication/using-pebblekit-ios/" title="" class="">PebbleKit iOS</a> is a great way to 
extend the functionality of your Pebble watchfaces and apps, but what if Java 
or Objective C just isn&#39;t your thing?  What if you love JavaScript? What if 
you just don&#39;t want to write the same companion app twice?</p><p>Now you don&#39;t have to! Enter <a href="http://cordova.apache.org/" title="" class="">Cordova</a> - an open
source framework for building cross-platform mobile apps using web technologies
such as HTML5 and JavaScript.  What does this mean for you?  One framework, and
one codebase for building Pebble companion apps for iOS and Android!</p><p>Cordova allows developers to create plugins that wrap native functionality such
as accessing the phone&#39;s contacts, calendar, camera, and other phone APIs. 
Plugins allow you to interface with these APIs through JavaScript, and use them
in your Cordova projects.  Needless to say, PebbleKit Android and PebbleKit iOS 
are now available as a singular 
<a href="https://www.npmjs.com/package/cordova-plugin-pebblekit" title="" class="">Cordova plugin</a>.</p><p>In this blog post, we&#39;ll look at how to use Cordova to create a companion
app that allows you to retrieve the next upcoming calendar event for the
current day.</p><h2 id="setup" class="anchor">Setup</h2><p>The first step will be installing Cordova and creating a new project.
Cordova provides these steps generically
<a href="http://cordova.apache.org/plugins/?platforms=cordova-android%2Ccordova-ios&sortBy=Downloads" title="" class="">here</a>,
but if you want to follow along down to the T, here are the steps listed below.</p><div class="highlight"><pre><span></span>$<span class="w"> </span>npm<span class="w"> </span>install<span class="w"> </span>-g<span class="w"> </span>cordova
$<span class="w"> </span>cordova<span class="w"> </span>create<span class="w"> </span>calendar-example<span class="w"> </span>com.pebble.calendarexample<span class="w"> </span><span class="s2">"Calendar Example"</span>
$<span class="w"> </span><span class="nb">cd</span><span class="w"> </span>calendar-example
$<span class="w"> </span>cordova<span class="w"> </span>platform<span class="w"> </span>add<span class="w"> </span>android
$<span class="w"> </span>cordova<span class="w"> </span>platform<span class="w"> </span>add<span class="w"> </span>ios
$<span class="w"> </span>cordova<span class="w"> </span>plugin<span class="w"> </span>add<span class="w"> </span>cordova-plugin-calendar
$<span class="w"> </span>cordova<span class="w"> </span>plugin<span class="w"> </span>add<span class="w"> </span>cordova-plugin-pebblekit
</pre></div>
<blockquote>
<p>Note, this assumes you have node/npm already installed and avaiable on your
machine. If not, head on over to <a href="https://nodejs.org/en/" title="" class="">nodejs.org</a> to
install node.</p></blockquote>
<p>Doesn&#39;t seem too bad! If the <code>cordova create</code> command seems a little scary to
you, don&#39;t be afraid to ask for help with <code>cordova create --help</code>.</p><h2 id="querying-events" class="anchor">Querying Events</h2><p>The next step is to use the calendar plugin we added earlier in order to fetch
the next event for the day.  Before we do that though, we&#39;ll need to to setup
the Cordova PebbleKit plugin, as shown below.  Fire up your favourite text
editor and open <code>www/js/index.js</code> file.  This is the JavaScript file that runs
when your app starts up, your application&#39;s control logic will go here.</p><p>Upon opening the file, you&#39;ll notice there&#39;s already a fair bit of code
generated by Cordova.  What&#39;s important here is the <code>onDeviceReady</code> function,
this is a callback you can use to be notified once the plugins for your Cordova
project have been loaded and are ready to be called.  Let&#39;s create our own
function called <code>fetchCalendarEvent</code> to be called once the PebbleKit plugin has
been setup.  We&#39;ll also declare a variable uuid with our Pebble app&#39;s UUID,
which is required when communicating with our watchapp via AppMessage.</p><div class="highlight"><pre><span></span><span class="kd">var</span><span class="w"> </span><span class="nx">uuid</span><span class="w"> </span><span class="o">=</span><span class="w"> </span><span class="s2">"ebc92429-483e-4b91-b5f2-ead22e7e002d"</span><span class="p">;</span>
<span class="kd">var</span><span class="w"> </span><span class="nx">app</span><span class="w"> </span><span class="o">=</span><span class="w"> </span><span class="p">{</span>

<span class="w">  </span><span class="cm">/* ... */</span>

<span class="w">  </span><span class="nx">onDeviceReady</span><span class="o">:</span><span class="w"> </span><span class="kd">function</span><span class="w"> </span><span class="p">()</span><span class="w"> </span><span class="p">{</span>
<span class="w">    </span><span class="nx">app</span><span class="p">.</span><span class="nx">receivedEvent</span><span class="p">(</span><span class="s1">'deviceready'</span><span class="p">);</span>
<span class="w">    </span><span class="nb">window</span><span class="p">.</span><span class="nx">pebblekit</span><span class="p">.</span><span class="nx">setup</span><span class="p">(</span><span class="nx">uuid</span><span class="p">,</span><span class="w"> </span><span class="kd">function</span><span class="w"> </span><span class="p">()</span><span class="w"> </span><span class="p">{</span>
<span class="w">      </span><span class="nx">app</span><span class="p">.</span><span class="nx">fetchCalendarEvent</span><span class="p">();</span>
<span class="w">    </span><span class="p">});</span>
<span class="w">  </span><span class="p">},</span>

<span class="w">  </span><span class="nx">fetchCalendarEvent</span><span class="o">:</span><span class="w"> </span><span class="kd">function</span><span class="w"> </span><span class="p">()</span><span class="w"> </span><span class="p">{</span>
<span class="w">    </span><span class="kd">var</span><span class="w"> </span><span class="nx">startDate</span><span class="w"> </span><span class="o">=</span><span class="w"> </span><span class="ow">new</span><span class="w"> </span><span class="nb">Date</span><span class="p">();</span><span class="w"> </span><span class="c1">// Now</span>
<span class="w">    </span><span class="kd">var</span><span class="w"> </span><span class="nx">endDate</span><span class="w"> </span><span class="o">=</span><span class="w"> </span><span class="ow">new</span><span class="w"> </span><span class="nb">Date</span><span class="p">();</span>
<span class="w">    </span><span class="nx">endDate</span><span class="p">.</span><span class="nx">setHours</span><span class="p">(</span><span class="mf">24</span><span class="p">,</span><span class="w"> </span><span class="mf">0</span><span class="p">,</span><span class="w"> </span><span class="mf">0</span><span class="p">,</span><span class="w"> </span><span class="mf">0</span><span class="p">);</span><span class="w"> </span><span class="c1">// Nearest midnight in the future</span>

<span class="w">    </span><span class="nb">window</span><span class="p">.</span><span class="nx">plugins</span><span class="p">.</span><span class="nx">calendar</span><span class="p">.</span><span class="nx">findEvent</span><span class="p">(</span>
<span class="w">      </span><span class="kc">undefined</span><span class="p">,</span><span class="w"> </span><span class="c1">// title</span>
<span class="w">      </span><span class="kc">undefined</span><span class="p">,</span><span class="w"> </span><span class="c1">// eventLocation</span>
<span class="w">      </span><span class="kc">undefined</span><span class="p">,</span><span class="w"> </span><span class="c1">// notes</span>
<span class="w">      </span><span class="nx">startDate</span><span class="p">,</span>
<span class="w">      </span><span class="nx">endDate</span><span class="p">,</span>
<span class="w">      </span><span class="nx">app</span><span class="p">.</span><span class="nx">calendarSuccessCallback</span><span class="p">,</span>
<span class="w">      </span><span class="nx">app</span><span class="p">.</span><span class="nx">calendarFailureCallback</span>
<span class="w">    </span><span class="p">);</span>
<span class="w">  </span><span class="p">},</span>

<span class="w">  </span><span class="nx">calendarSuccessCallback</span><span class="o">:</span><span class="w"> </span><span class="kd">function</span><span class="w"> </span><span class="p">(</span><span class="nx">events</span><span class="p">)</span><span class="w"> </span><span class="p">{</span>
<span class="w">    </span><span class="c1">// TODO</span>
<span class="w">  </span><span class="p">},</span>

<span class="w">  </span><span class="nx">calendarFailureCallback</span><span class="o">:</span><span class="w"> </span><span class="kd">function</span><span class="w"> </span><span class="p">(</span><span class="nx">err</span><span class="p">)</span><span class="w"> </span><span class="p">{</span>
<span class="w">    </span><span class="nx">console</span><span class="p">.</span><span class="nx">error</span><span class="p">(</span><span class="s1">'Failed to fatch calendar events'</span><span class="p">,</span><span class="w"> </span><span class="nx">err</span><span class="p">);</span>
<span class="w">  </span><span class="p">}</span>

<span class="w">  </span><span class="cm">/* ... */</span>

<span class="p">}</span>
</pre></div>
<blockquote>
<p>Note, the calendar plugin recommends <a href="https://github.com/EddyVerbruggen/Calendar-PhoneGap-Plugin#android-6-m-permissions" title="" class="">checking that you have sufficient
permissions</a>
before using its APIs.  For the sake of brevity, the permission workflow has
been omitted in this post.</p></blockquote>
<p>The first 3 parameters we passed to the <code>calendar.findEvent</code> function are
undefined, since we don&#39;t want to filter out events with specific titles,
locations, or notes.  The last two parameters are callback functions that will
be executed when the app has succeeded or failed to fetch calendar data.  Our
calendarFailureCallback will log a simple message, and our 
calendarSuccessCallback will sort through the events and find the earliest 
event in the list.</p><div class="highlight"><pre><span></span><span class="nx">calendarSuccessCallback</span><span class="o">:</span><span class="w"> </span><span class="kd">function</span><span class="w"> </span><span class="p">(</span><span class="nx">events</span><span class="p">)</span><span class="w"> </span><span class="p">{</span>
<span class="w">  </span><span class="k">if</span><span class="w"> </span><span class="p">(</span><span class="nx">events</span><span class="p">.</span><span class="nx">length</span><span class="w"> </span><span class="o">==</span><span class="w"> </span><span class="mf">0</span><span class="p">)</span><span class="w"> </span><span class="p">{</span>
<span class="w">    </span><span class="c1">// TODO</span>
<span class="w">    </span><span class="k">return</span><span class="p">;</span>
<span class="w">  </span><span class="p">}</span>

<span class="w">  </span><span class="c1">// Find the earliest returned event</span>
<span class="w">  </span><span class="kd">var</span><span class="w"> </span><span class="nx">earliestEvent</span><span class="w"> </span><span class="o">=</span><span class="w"> </span><span class="nx">events</span><span class="p">[</span><span class="mf">0</span><span class="p">];</span>
<span class="w">  </span><span class="k">for</span><span class="w"> </span><span class="p">(</span><span class="kd">var</span><span class="w"> </span><span class="nx">i</span><span class="w"> </span><span class="o">=</span><span class="w"> </span><span class="mf">1</span><span class="p">;</span><span class="w"> </span><span class="nx">i</span><span class="w"> </span><span class="o">&lt;</span><span class="w"> </span><span class="nx">events</span><span class="p">.</span><span class="nx">length</span><span class="p">;</span><span class="w"> </span><span class="nx">i</span><span class="o">++</span><span class="p">)</span><span class="w"> </span><span class="p">{</span>
<span class="w">    </span><span class="kd">var</span><span class="w"> </span><span class="nx">tempDate</span><span class="w"> </span><span class="o">=</span><span class="w"> </span><span class="nx">events</span><span class="p">[</span><span class="nx">i</span><span class="p">];</span>
<span class="w">    </span><span class="kd">var</span><span class="w"> </span><span class="nx">date1</span><span class="w"> </span><span class="o">=</span><span class="w"> </span><span class="nb">Date</span><span class="p">.</span><span class="nx">parse</span><span class="p">(</span><span class="nx">earliestEvent</span><span class="p">.</span><span class="nx">startDate</span><span class="p">);</span>
<span class="w">    </span><span class="kd">var</span><span class="w"> </span><span class="nx">date2</span><span class="w"> </span><span class="o">=</span><span class="w"> </span><span class="nb">Date</span><span class="p">.</span><span class="nx">parse</span><span class="p">(</span><span class="nx">tempDate</span><span class="p">.</span><span class="nx">startDate</span><span class="p">);</span>

<span class="w">    </span><span class="k">if</span><span class="w"> </span><span class="p">(</span><span class="nx">date2</span><span class="w"> </span><span class="o">&lt;</span><span class="w"> </span><span class="nx">date1</span><span class="p">)</span><span class="w"> </span><span class="p">{</span>
<span class="w">      </span><span class="nx">earliestEvent</span><span class="w"> </span><span class="o">=</span><span class="w"> </span><span class="nx">tempDate</span><span class="p">;</span>
<span class="w">    </span><span class="p">}</span>
<span class="w">  </span><span class="p">}</span>
<span class="p">},</span>
</pre></div><h2 id="sending-an-appmessage" class="anchor">Sending An AppMessage</h2><p>All we have to do now is send the relevent bits of information down to our
Pebble app.  This is where the Pebble plugin is going to come in handy.  At the
end of the function, we&#39;ll call <code>sendAppMessage</code> which works in a similar
manner to <a href="/jp_manual/pebblekit-js/Pebble/#sendAppMessage" title="" class="">PebbleKit JS&#39;
sendAppMessage</a>
function.</p><p>The title is easy to snag - it&#39;s a property on the event object, available via
<code>event.title</code>.  The hours and minutes will take a bit of work since they only
exist within a string property on the object (<code>event.startDate</code>).  Luckily the
format for the date is fixed, so we know where in the string it will be.</p><p>With this in mind, we can use the
<a href="https://developer.mozilla.org/en-US/docs/Web/JavaScript/Reference/Global_Objects/String/substring" title="" class="">String.prototype.substring</a>
method to extract the numbers we want.  The method takes two parameters, the
first is the starting index (inclusive) of the substring, and the second is the
the end index (exclusive).  So if we want the hour, we&#39;d pass 11 as the
starting index, and 13 as the end index.  This will create a substring
containing the 11th and 12th characters of the string.</p><p>Also in this example, the <code>data</code> object represents our AppMessage, where <code>10</code>,
<code>11</code>, and <code>12</code> are the AppMessage keys.</p><div class="highlight"><pre><span></span><span class="c1">// Format is in YYYY-MM-DD HH:mm:ss</span>
<span class="kd">var</span><span class="w"> </span><span class="nx">hourString</span><span class="w"> </span><span class="o">=</span><span class="w"> </span><span class="nx">earliestEvent</span><span class="p">.</span><span class="nx">startDate</span><span class="p">.</span><span class="nx">substring</span><span class="p">(</span><span class="mf">11</span><span class="p">,</span><span class="w"> </span><span class="mf">13</span><span class="p">);</span>
<span class="kd">var</span><span class="w"> </span><span class="nx">hour</span><span class="w"> </span><span class="o">=</span><span class="w"> </span><span class="nb">parseInt</span><span class="p">(</span><span class="nx">hourString</span><span class="p">);</span>
<span class="kd">var</span><span class="w"> </span><span class="nx">minuteString</span><span class="w"> </span><span class="o">=</span><span class="w"> </span><span class="nx">earliestEvent</span><span class="p">.</span><span class="nx">startDate</span><span class="p">.</span><span class="nx">substring</span><span class="p">(</span><span class="mf">14</span><span class="p">,</span><span class="w"> </span><span class="mf">16</span><span class="p">);</span>
<span class="kd">var</span><span class="w"> </span><span class="nx">minute</span><span class="w"> </span><span class="o">=</span><span class="w"> </span><span class="nb">parseInt</span><span class="p">(</span><span class="nx">minuteString</span><span class="p">);</span>

<span class="c1">// AppMessage keys</span>
<span class="kd">var</span><span class="w"> </span><span class="nx">data</span><span class="w"> </span><span class="o">=</span><span class="w"> </span><span class="p">{</span>
<span class="w">  </span><span class="s1">'10'</span><span class="o">:</span><span class="w"> </span><span class="nx">earliestEvent</span><span class="p">.</span><span class="nx">title</span><span class="p">,</span>
<span class="w">  </span><span class="s1">'11'</span><span class="o">:</span><span class="w"> </span><span class="nx">hour</span><span class="p">,</span>
<span class="w">  </span><span class="s1">'12'</span><span class="o">:</span><span class="w"> </span><span class="nx">minute</span>
<span class="p">};</span>

<span class="nb">window</span><span class="p">.</span><span class="nx">pebblekit</span><span class="p">.</span><span class="nx">sendAppMessage</span><span class="p">(</span><span class="nx">uuid</span><span class="p">,</span><span class="w"> </span><span class="nx">data</span><span class="p">,</span><span class="w"> </span><span class="kd">function</span><span class="w"> </span><span class="p">()</span><span class="w"> </span><span class="p">{</span>
<span class="w">  </span><span class="nx">console</span><span class="p">.</span><span class="nx">log</span><span class="p">(</span><span class="s1">'sent AppMessage'</span><span class="p">,</span><span class="w"> </span><span class="nx">data</span><span class="p">);</span>
<span class="p">},</span><span class="w"> </span><span class="kd">function</span><span class="w"> </span><span class="p">(</span><span class="nx">err</span><span class="p">)</span><span class="w"> </span><span class="p">{</span>
<span class="w">  </span><span class="nx">console</span><span class="p">.</span><span class="nx">error</span><span class="p">(</span><span class="s1">'Couldn\'t send AppMessage'</span><span class="p">,</span><span class="w"> </span><span class="nx">err</span><span class="p">);</span>
<span class="p">});</span>
</pre></div><p>The only thing left is to read the AppMessage on the C side.  To quote every
university professor I&#39;ve ever had: &quot;We leave this as an exercise to the
reader&quot;.  (Just kidding, you can see the watchface&#39;s full C
code <a href="https://github.com/pebble-hacks/cordova-plugin-pebblekit/blob/master/example/pebble/src/pebble.c" title="" class="">here</a>,
or consult the
<a href="/jp_manual/guides/communication/sending-and-receiving-data" title="" class="">documentation</a>).</p><p>While we only used two of the APIs of the PebbleKit Cordova plugin here, there
is much more available to you, all with <a href="https://github.com/pebble-hacks/cordova-plugin-pebblekit" title="" class="">new and shiny
documentation</a></p><p>For folks that are interested, our Cordova plugin is completely open source,
and hosted on
<a href="https://github.com/pebble-hacks/cordova-plugin-pebblekit" title="" class="">Github</a>. We welcome
bug reports, feature requests, and contributions with open arms :).</p><p>And that&#39;s all there is to it!  If you&#39;ve been holding back on writing a
companion app for your amazing app, now&#39;s the time to try it!</p>]]></content>
  </entry>
  
  <entry>
    <title type="html"><![CDATA[Introducing Clay - App configuration made easy]]></title>
    <link href="http://pebble.lunarians.net/blog/2016/06/24/introducing-clay/"/>
    <updated>2016-06-24T00:00:00+00:00</updated>
    <id>http://pebble.lunarians.net/blog/2016/06/24/introducing-clay</id>
    <content type="html"><![CDATA[<p>It is with great pleasure that I present to you, Clay, a Pebble package that makes it easy to add offline configuration pages to your Pebble apps. All you need to get started is a couple lines of JavaScript and a JSON file; no servers, HTML or CSS required.</p><p><img src="/assets/images/blog/2016-06-24-introducing-clay/clay-example.png" alt="Clay Example" width="421" /></p><h2 id="how-to-get-started" class="anchor">How to get started</h2><p>This post aims to provide high level explanation of how the framework works and how it came to be. Below is a quick overview of how easy it is to make your app configurable with Clay. If you would like to learn how to integrate Clay into your project, read our guide on <a href="/jp_manual/guides/user-interfaces/app-configuration/" title="" class="">app configuration</a> or read the full documentation on the project <a href="https://github.com/pebble/clay#clay" title="" class="">GitHub repository.</a></p><p><strong>1) Install the module via <a href="/jp_manual/guides/pebble-packages/using-packages/" title="" class="">Pebble Packages</a></strong>
 - SDK: <code>$ pebble package install pebble-clay</code>
 - CloudPebble: Add <code>pebble-clay</code>, version <code>^1.0.0</code> to your project dependencies.</p><p><strong>2) Create a configuration file that looks something like:</strong></p><div class="highlight"><pre><span></span><span class="nx">module</span><span class="p">.</span><span class="nx">exports</span><span class="w"> </span><span class="o">=</span><span class="w"> </span><span class="p">[</span>
<span class="w">  </span><span class="p">{</span>
<span class="w">    </span><span class="s2">"type"</span><span class="o">:</span><span class="w"> </span><span class="s2">"heading"</span><span class="p">,</span>
<span class="w">    </span><span class="s2">"defaultValue"</span><span class="o">:</span><span class="w"> </span><span class="s2">"Example App"</span>
<span class="w">  </span><span class="p">},</span>
<span class="w">  </span><span class="p">{</span>
<span class="w">    </span><span class="s2">"type"</span><span class="o">:</span><span class="w"> </span><span class="s2">"section"</span><span class="p">,</span>
<span class="w">    </span><span class="s2">"items"</span><span class="o">:</span><span class="w"> </span><span class="p">[</span>
<span class="w">      </span><span class="p">{</span>
<span class="w">        </span><span class="s2">"type"</span><span class="o">:</span><span class="w"> </span><span class="s2">"color"</span><span class="p">,</span>
<span class="w">        </span><span class="s2">"messageKey"</span><span class="o">:</span><span class="w"> </span><span class="s2">"BackgroundColor"</span><span class="p">,</span>
<span class="w">        </span><span class="s2">"defaultValue"</span><span class="o">:</span><span class="w"> </span><span class="s2">"0x000000"</span><span class="p">,</span>
<span class="w">        </span><span class="s2">"label"</span><span class="o">:</span><span class="w"> </span><span class="s2">"Background Color"</span>
<span class="w">      </span><span class="p">},</span>
<span class="w">      </span><span class="p">{</span>
<span class="w">        </span><span class="s2">"type"</span><span class="o">:</span><span class="w"> </span><span class="s2">"toggle"</span><span class="p">,</span>
<span class="w">        </span><span class="s2">"messageKey"</span><span class="o">:</span><span class="w"> </span><span class="s2">"Animations"</span><span class="p">,</span>
<span class="w">        </span><span class="s2">"label"</span><span class="o">:</span><span class="w"> </span><span class="s2">"Enable Animations"</span><span class="p">,</span>
<span class="w">        </span><span class="s2">"defaultValue"</span><span class="o">:</span><span class="w"> </span><span class="kc">false</span>
<span class="w">      </span><span class="p">}</span>
<span class="w">    </span><span class="p">]</span>
<span class="w">  </span><span class="p">},</span>
<span class="w">  </span><span class="p">{</span>
<span class="w">    </span><span class="s2">"type"</span><span class="o">:</span><span class="w"> </span><span class="s2">"submit"</span><span class="p">,</span>
<span class="w">    </span><span class="s2">"defaultValue"</span><span class="o">:</span><span class="w"> </span><span class="s2">"Save Settings"</span>
<span class="w">  </span><span class="p">}</span>
<span class="p">];</span>
</pre></div><p><strong>3) Update your project settings with the matching <code>messageKeys</code> from the config above.</strong></p><p><strong>4) Add a few lines to your <code>index.js</code></strong></p><div class="highlight"><pre><span></span><span class="kd">var</span><span class="w"> </span><span class="nx">Clay</span><span class="w"> </span><span class="o">=</span><span class="w"> </span><span class="nx">require</span><span class="p">(</span><span class="s1">'pebble-clay'</span><span class="p">);</span>
<span class="kd">var</span><span class="w"> </span><span class="nx">clayConfig</span><span class="w"> </span><span class="o">=</span><span class="w"> </span><span class="nx">require</span><span class="p">(</span><span class="s1">'./config'</span><span class="p">);</span>
<span class="kd">var</span><span class="w"> </span><span class="nx">clay</span><span class="w"> </span><span class="o">=</span><span class="w"> </span><span class="ow">new</span><span class="w"> </span><span class="nx">Clay</span><span class="p">(</span><span class="nx">clayConfig</span><span class="p">);</span>
</pre></div><p><strong>5) Retrieve the values on the C side using standard <a href="/jp_manual/guides/communication/sending-and-receiving-data/" title="" class="">app messages</a> or alternatively let <a href="https://github.com/gregoiresage/enamel" title="" class="">enamel</a> do the work for you.</strong></p><h2 id="why-i-created-clay" class="anchor">Why I created Clay</h2><p>Clay began as a side project of mine. Whilst developing my <a href="https://apps.pebble.com/applications/560ae4754d43a36393000001" title="" class="">Segment watchface</a>, I wanted to add a configuration page to allow users to customize the colors of the watchface. However, I soon discovered this process to be rather fiddly. The old way of doing things required you to create and host HTML pages even for simple things like changing a background color or toggling an option. You would also need to write a bunch of boilerplate JavaScript to serialize and send the settings to the watch. Best case, for developers, this is super tedious. Worst case, it is terrifying. By day, I work as a web developer (mainly front-end) so if I was finding the process tiresome, I could only imagine how challenging it would be for someone who wasn&#39;t familiar with web technologies. And so I decided to create a framework that would alleviate this barrier for developers. I had a number of requirements that needed to be met in order for the framework to achieve my goals:</p>
<ul>
<li>It should not require developers to write any HTML or CSS.</li>
<li>It should use JSON to define the generated config page.</li>
<li>It should all work offline</li>
<li>Developers should be able to add interactivity to the config page without manually manipulating DOM.</li>
<li>Developers should be able to create and share their own custom components.</li>
<li>The config page should be able to be versioned with the rest of the code in the project.</li>
<li>It should have extensive unit tests with 100% test coverage.</li>
</ul>
<h2 id="how-clay-actually-works" class="anchor">How Clay Actually Works</h2><p>Clay has two main components. The first is a very long string that is compiled from all the HTML, CSS and JavaScript that forms the skeleton of the generated config page. The second is the module that gets included in your <code>index.js</code>. This module is in charge of bundling all the dynamic elements set by the developer into a format that can be opened using <code>Pebble.openURL()</code>. It is also in charge of listening for the <code>webviewclosed</code> event and persisting the user&#39;s settings to local storage. I use Gulp and a series of Browserify transforms to compile all these components into a single module. The advantage of using a system such as Browserify, is that later, Clay can be made into a stand alone module to be used by developers who have very advanced use cases that require Clay to be run in a hosted HTML page.</p><p>The most challenging item on the requirements list was making the whole thing work offline. Neither of the Pebble mobile apps allow file system access from the config page&#39;s webview, so I had to get a little creative. It turns out that <a href="https://en.wikipedia.org/wiki/Data_URI_scheme" title="" class="">Data URIs</a> work with more than images. You can in fact encode an entire HTML page into the URI. This was the solution to making the config pages offline. It sounds crazy but this method actually provides other advantages for developers beyond offline access. By bundling all the HTML, CSS and JavaScript into the Clay package, the version of Clay being used by the developer will not change without the developer rebuilding their app. This means developers do not need to worry about the behavior of their app&#39;s configuration page potentially breaking as new versions of Clay get released.</p><h2 id="advanced-use" class="anchor">Advanced Use</h2><p>If developers want to add additional functionality to their config page, they can. Clay allows developers to inject, what I call a <a href="https://github.com/pebble/clay#custom-function" title="" class=""><code>custom function</code></a> into the generated config page. This allows developers control of their config page without needing to manipulate the DOM. Clay achieves this by exposing an API that provides a consistent way of interacting with the config page as well as making AJAX requests. Instead of manually updating the values of HTML elements, developers can use the much simpler Clay API.</p><h2 id="where-to-find-more-information" class="anchor">Where to find more information</h2>
<ul>
<li><a href="/jp_manual/guides/user-interfaces/app-configuration/" title="" class="">App configuration guide.</a></li>
<li><a href="https://github.com/pebble/clay" title="" class="">Clay GitHub repository including full documentation.</a></li>
<li>Chat to us in the <code>#clay</code> channel on <a href="https://discordapp.com/invite/aRUAYFN" title="" class="">Discord</a>.</li>
<li>Visit the <a href="https://forums.pebble.com/" title="" class="">Pebble Forums</a></li>
<li>Tweet at <a href="https://twitter.com/pebbledev" title="" class="">@pebbledev</a></li>
</ul>
<h2 id="how-to-get-involved" class="anchor">How to get involved</h2><p>Clay is open source and welcomes pull requests from anybody. Have a look at the <a href="https://github.com/pebble/clay/blob/master/CONTRIBUTING.md" title="" class="">contributing guide</a> for instructions on how you can help make Clay even better. Regardless of your skill level, if you have any ideas on how Clay could be improved or if you find any bugs, we would love you to <a href="https://github.com/pebble/clay/issues/new" title="" class="">submit an issue on GitHub</a>.</p>]]></content>
  </entry>
  
  <entry>
    <title type="html"><![CDATA[A Wild SDK Appears]]></title>
    <link href="http://pebble.lunarians.net/blog/2016/06/15/sdk4-preview/"/>
    <updated>2016-06-15T00:00:00+00:00</updated>
    <id>http://pebble.lunarians.net/blog/2016/06/15/sdk4-preview</id>
    <content type="html"><![CDATA[<p>Developers rejoice - we’ve released the first version of our <a href="/jp_manual/sdk4" title="" class="">SDK 4</a>
developer preview! This SDK enables you to start building applications for the
new Diorite platform (Pebble 2), and includes a set of new APIs for interacting
with the 4.0 user experience.</p><p>In this blog post we’ll dive into the <a href="/jp_manual/docs/c/Foundation/App_Glance/" title="" class="">App Glance</a>,
<a href="/jp_manual/docs/c/User_Interface/UnobstructedArea/" title="" class=""><code>UnobstructedArea</code></a>, and
<a href="/jp_manual/docs/c/Foundation/Exit_Reason/" title="" class=""><code>AppExitReason</code></a> APIs, and explain
how you can use them to create great experiences for your users!</p><h2 id="app-glance-api" class="anchor">App Glance API</h2><p>Let’s start with the App Glance API, which allows applications to present
information for the launcher to display. The information an application displays
in the launcher is called an app glance - and the information that is displayed
at any particular point in time is referred to as an <a href="/jp_manual/docs/c/Foundation/App_Glance/#AppGlanceSlice" title="" class=""><code>AppGlanceSlice</code></a>.</p><p><img src="/assets/images/blog/2016-06-15-sdk4-preview/virtual-pet.png" alt="Virtual Pet App" class="pebble-screenshot pebble-screenshot--time-black" /></p><p><code>AppGlanceSlice</code>s have expiration times, which means you can add multiple slices
at once. Slices will be displayed in the order they are added and removed at
their specified expiration times.</p><div class="highlight"><pre><span></span><span class="k">static</span><span class="w"> </span><span class="kt">void</span><span class="w"> </span><span class="nf">prv_update_app_glance</span><span class="p">(</span><span class="n">AppGlanceReloadSession</span><span class="w"> </span><span class="o">*</span><span class="n">session</span><span class="p">,</span><span class="w"> </span><span class="kt">size_t</span><span class="w"> </span><span class="n">limit</span><span class="p">,</span><span class="w"> </span><span class="kt">void</span><span class="w"> </span><span class="o">*</span><span class="n">context</span><span class="p">)</span><span class="w"> </span><span class="p">{</span>
<span class="w">  </span><span class="c1">// This shouldn't happen, but developers should always ensure they have</span>
<span class="w">  </span><span class="c1">// sufficient slices, or adding slices may fail.</span>
<span class="w">  </span><span class="k">if</span><span class="w"> </span><span class="p">(</span><span class="n">limit</span><span class="w"> </span><span class="o">&lt;</span><span class="w"> </span><span class="mi">1</span><span class="p">)</span><span class="w"> </span><span class="k">return</span><span class="p">;</span>

<span class="w">  </span><span class="c1">// !! When layout.icon_resource_id is not set, the app's default icon is used</span>
<span class="w">  </span><span class="k">const</span><span class="w"> </span><span class="n">AppGlanceSlice</span><span class="w"> </span><span class="n">entry</span><span class="w"> </span><span class="o">=</span><span class="w"> </span><span class="p">(</span><span class="n">AppGlanceSlice</span><span class="p">)</span><span class="w"> </span><span class="p">{</span>
<span class="w">    </span><span class="p">.</span><span class="n">layout</span><span class="w"> </span><span class="o">=</span><span class="w"> </span><span class="p">{</span>
<span class="w">      </span><span class="p">.</span><span class="n">template_string</span><span class="w"> </span><span class="o">=</span><span class="w"> </span><span class="s">"Hello from the app glance"</span>
<span class="w">    </span><span class="p">},</span>
<span class="w">    </span><span class="p">.</span><span class="n">expiration_time</span><span class="w"> </span><span class="o">=</span><span class="w"> </span><span class="n">APP_GLANCE_SLICE_NO_EXPIRATION</span>
<span class="w">  </span><span class="p">};</span>

<span class="w">  </span><span class="c1">// Add the slice, and store the result so we can check it later</span>
<span class="w">  </span><span class="n">AppGlanceResult</span><span class="w"> </span><span class="n">result</span><span class="w"> </span><span class="o">=</span><span class="w"> </span><span class="n">app_gpance_add_slice</span><span class="p">(</span><span class="n">session</span><span class="p">,</span><span class="w"> </span><span class="n">entry</span><span class="p">);</span>
<span class="p">}</span>
</pre></div><p>To dig into this feature, we recommend you start with our new
<a href="/jp_manual/guides/user-interfaces/appglance-c" title="" class="">AppGlance C API guide</a>, and also give the
<a href="/jp_manual/docs/c/Foundation/App_Glance/" title="" class="">API docs</a> a quick read.</p>
<blockquote>
<p>We are planning to extend the AppGlance API to include a PebbleKit JS API, as
well as a HTTP web API, intended to allow developers to push <code>AppGlanceSlice</code>s
from external web services to their users&#39; smartwatches.</p></blockquote>
<h2 id="unobstructedarea-api" class="anchor">UnobstructedArea API</h2><p>The <a href="/jp_manual/docs/c/User_Interface/UnobstructedArea/" title="" class=""><code>UnobstructedArea</code></a> API
allows developers to create watchfaces capable of sensing, and responding to
Timeline Quick View events. Timeline Quick View is a new feature in SDK 4.0, 
which displays upcoming and ongoing events on top of the user’s watchface. The 
functionality added through the <code>UnobstructedArea</code> API allows developers to get 
the unobstructed bounds of a layer, or subscribe to events related to the
watchface’s unobstructed area changing.</p><div class="highlight"><pre><span></span><span class="k">static</span><span class="w"> </span><span class="kt">int</span><span class="w"> </span><span class="n">s_offset_top_percent</span><span class="w"> </span><span class="o">=</span><span class="w"> </span><span class="mi">33</span><span class="p">;</span>
<span class="k">static</span><span class="w"> </span><span class="kt">int</span><span class="w"> </span><span class="n">s_offset_bottom_percent</span><span class="w"> </span><span class="o">=</span><span class="w"> </span><span class="mi">20</span><span class="p">;</span>

<span class="k">static</span><span class="w"> </span><span class="kt">void</span><span class="w"> </span><span class="nf">prv_unobstructed_change</span><span class="p">(</span><span class="n">AnimationProgress</span><span class="w"> </span><span class="n">progress</span><span class="p">,</span><span class="w"> </span><span class="kt">void</span><span class="w"> </span><span class="o">*</span><span class="n">context</span><span class="p">)</span><span class="w"> </span><span class="p">{</span>
<span class="w">  </span><span class="c1">// Get the total available screen real-estate</span>
<span class="w">  </span><span class="n">GRect</span><span class="w"> </span><span class="n">bounds</span><span class="w"> </span><span class="o">=</span><span class="w"> </span><span class="n">layer_get_unobstructed_bounds</span><span class="p">(</span><span class="n">window_layer</span><span class="p">);</span>

<span class="w">  </span><span class="c1">// Shift the Y coordinate of the top text layer</span>
<span class="w">  </span><span class="n">GRect</span><span class="w"> </span><span class="n">top_frame</span><span class="w"> </span><span class="o">=</span><span class="w"> </span><span class="n">layer_get_frame</span><span class="p">(</span><span class="n">text_layer_get_layer</span><span class="p">(</span><span class="n">s_top_text_layer</span><span class="p">));</span>
<span class="w">  </span><span class="n">top_frame</span><span class="p">.</span><span class="n">origin</span><span class="p">.</span><span class="n">y</span><span class="w"> </span><span class="o">=</span><span class="w"> </span><span class="n">bounds</span><span class="p">.</span><span class="n">size</span><span class="p">.</span><span class="n">h</span><span class="w"> </span><span class="o">*</span><span class="w"> </span><span class="n">s_offset_top_percent</span><span class="w"> </span><span class="o">/</span><span class="w"> </span><span class="mi">100</span><span class="p">;</span>
<span class="w">  </span><span class="n">layer_set_frame</span><span class="p">(</span><span class="n">top_frame</span><span class="p">,</span><span class="w"> </span><span class="n">text_layer_get_layer</span><span class="p">(</span><span class="n">s_top_text_layer</span><span class="p">));</span>


<span class="w">  </span><span class="c1">// Shift the Y coordinate of our bottom text layer</span>
<span class="w">  </span><span class="n">GRect</span><span class="w"> </span><span class="n">bottom_frame</span><span class="w"> </span><span class="o">=</span><span class="w"> </span><span class="n">layer_get_frame</span><span class="p">(</span><span class="n">text_layer_get_layer</span><span class="p">(</span><span class="n">s_bottom_text_layer</span><span class="p">));</span>
<span class="w">  </span><span class="n">bottom_frame</span><span class="p">.</span><span class="n">origin</span><span class="p">.</span><span class="n">y</span><span class="w"> </span><span class="o">=</span><span class="w"> </span><span class="n">bounds</span><span class="p">.</span><span class="n">size</span><span class="p">.</span><span class="n">h</span><span class="w"> </span><span class="o">*</span><span class="w"> </span><span class="n">s_offset_bottom_percent</span><span class="w"> </span><span class="o">/</span><span class="w"> </span><span class="mi">100</span><span class="p">;</span>
<span class="w">  </span><span class="n">layer_set_frame</span><span class="p">(</span><span class="n">bottom_frame</span><span class="p">,</span><span class="w"> </span><span class="n">text_layer_get_layer</span><span class="p">(</span><span class="n">s_bottom_text_layer</span><span class="p">));</span>
<span class="p">}</span>

<span class="k">static</span><span class="w"> </span><span class="kt">void</span><span class="w"> </span><span class="nf">prv_main_window_load</span><span class="p">(</span><span class="n">Window</span><span class="w"> </span><span class="o">*</span><span class="n">window</span><span class="p">)</span><span class="w"> </span><span class="p">{</span>
<span class="w">  </span><span class="n">unobstructed_area_service_subscribe</span><span class="p">((</span><span class="n">UnobstructedAreaHandlers</span><span class="p">)</span><span class="w"> </span><span class="p">{</span>
<span class="w">    </span><span class="p">.</span><span class="n">change</span><span class="w"> </span><span class="o">=</span><span class="w"> </span><span class="n">prv_unobstructed_change</span>
<span class="w">  </span><span class="p">},</span><span class="w"> </span><span class="nb">NULL</span><span class="p">);</span>
<span class="p">}</span>
</pre></div>
<blockquote>
<p>We encourage developers to begin exploring what their existing watchfaces will
look like when the system is displaying the Timeline Quick View dialog, and
adjust their designs to provide the best experience possible for users.</p></blockquote>
<p>Take a look at our <a href="/jp_manual/guides/user-interfaces/unobstructed-area/" title="" class="">UnobstructedArea API Guide</a>
and the <a href="/jp_manual/docs/c/User_Interface/UnobstructedArea/" title="" class="">API documentation</a> to
get started!</p><h2 id="appexitreason-api" class="anchor">AppExitReason API</h2><p>One of the APIs we haven’t talked about as much is the
<a href="/jp_manual/docs/c/Foundation/Exit_Reason/" title="" class=""><code>AppExitReason</code></a> API, which enables
developers to specify why their app exited, and determines whether the system
returns the user to the launcher, or the active watchface. Take a look at our
<a href="/jp_manual/guides/user-interfaces/app-exit-reason" title="" class="">AppExitReason API Guide</a>,
and read <a href="/jp_manual/docs/c/Foundation/Exit_Reason" title="" class="">the API docs</a> to learn more.</p><p>This feature enables developers to create &quot;One Click Action&quot; watchapps, that
perform an action, then immediately return the user to the watchface to create a
simple, fluid experience.</p><p><img src="/assets/images/blog/2016-06-15-sdk4-preview/uber.gif" alt="Uber App" class="pebble-screenshot pebble-screenshot--time-black" /></p><p>To help get you started thinking about and designing One Click Action apps,
we’ve created a <a href="/jp_manual/guides/design-and-interaction/one-click-actions" title="" class="">One Click Action App Guide</a>
around the relatively minimal example of locking and unlocking your front door
(with a <a href="https://lockitron.com" title="" class="">Lockitron lock</a>).</p><h2 id="4-0-emulator" class="anchor">4.0 Emulator</h2><p>The SDK 4 preview also includes an update to the emulator, which not only adds
support for Pebble 2, but includes the updated 4.0 user interface, and a few
other goodies that we’re sure developers will love.</p><p>The new emulator includes a launcher capable of displaying watchapps’ glances,
and can be accessed by pressing the <code>Select</code> button from the watchface.</p><p>CloudPebble and the Pebble Tool also include new functionality to enable
developers to toggle Timeline Quick View, allowing you to make sure your
watchface looks good in every context!</p><p>Finally, we’ve added the ability to install multiple watchfaces and watchapps
into the emulator. Watchfaces and watchapps installed into the emulator will
remain installed (even if the emulator is closed) until <code>pebble wipe</code> is called
from the command line.</p><p>Due to limitations with CloudPebble, this feature is currently only available in
the Pebble Tool.</p><h2 id="whats-next" class="anchor">What’s Next</h2><p>The SDK 4 developer preview is exactly that, a preview. You’ve probably noticed
a few really important and exciting features we didn’t mention - the Heart Rate
API has been designed, but is not yet fully implemented, and we have not yet
added the ability to build applications for the Emery Platform (Pebble Time 2).</p><p>The official SDK 4 release is currently planned for the end of August - and it
will include not only the Heart Rate API, and support for building Emery
applications, but the first version of Pebble’s fantastic new embedded
JavaScript SDK, <a href="http://pebble.github.io/rockyjs/" title="" class="">Rocky.js</a>.</p><h2 id="show-us-what-you-make" class="anchor">Show Us What You Make</h2><p>While we’ve been conceptualizing and designing the new functionality in SDK 4
for quite a long time, the API itself is relatively new, even for those of us
lucky enough to ‘be on the inside’ - so we’ve only really just begun to see
what’s possible, and we’re more than excited to see what you’ll build with this
new functionality.</p><p>Send us a link to something you’ve built on Twitter (
<a href="https://twitter.com/pebbledev" title="" class="">@pebbledev</a>) and we’ll look at including it in
an upcoming newsletter (and send some swag your way).</p><p>Happy Hacking!</p><p>Team Pebble</p>]]></content>
  </entry>
  
  <entry>
    <title type="html"><![CDATA[Introducing Pebble Packages]]></title>
    <link href="http://pebble.lunarians.net/blog/2016/06/07/pebble-packages/"/>
    <updated>2016-06-07T00:00:00+00:00</updated>
    <id>http://pebble.lunarians.net/blog/2016/06/07/pebble-packages</id>
    <content type="html"><![CDATA[<p>I am thrilled to announce that, as part of SDK 3.13 and Pebble Tool 4.3, we have
launched our own packaging system: Pebble Packages!</p><p>There are already a healthy selection of Pebble libraries to be had, such as
Yuriy&#39;s excellent <a href="https://github.com/ygalanter/EffectLayer" title="" class="">EffectLayer</a>,
Reboot&#39;s Ramblings&#39;
<a href="https://github.com/rebootsramblings/GBitmap-Colour-Palette-Manipulator" title="" class="">palette manipulator</a>,
or even our own <a href="https://github.com/pebble-hacks/owm-weather" title="" class="">weather library</a>.
However, using them today is inelegant: you generally have to copy/paste all of
the library code into your own project and follow some other setup instructions:
assigning appmessage keys, editing resources into your appinfo.json, or similar.</p><p>Starting today, using a Pebble Package can be as simple as running
<code>pebble package install pebble-owm-weather</code>. A Pebble Package can contain
both C code for the watch and JavaScript code for the phone. Furthermore, it can
also contain any resources, and define its own appmessage keys. All numeric
identifiers will be resolved at app build time to ensure there are never any
conflicts. This helps to enable zero-setup packages of all kinds.</p><p>To make the usage of appmessages in Pebble Packages possible, we have also
substantially improved the functionality of the old <code>appKeys</code> section of
appinfo.json. We will now automatically insert the keys into your C code with
the prefix <code>MESSAGE_KEY_</code>. You can also access their numeric values from
JavaScript by requiring the <code>message_keys</code> module:
<code>var keys = require(&#39;message_keys&#39;)</code>.</p><p>Packages would be nothing without a package manager, so we have built our
packaging system on top of the excellent <a href="https://npmjs.com" title="" class="">npm</a> package manager. This gives
us support for dependency management, versioning, package hosting, and more. Furthermore,
some traditional JavaScript modules on npm will work out of the box, as long as
they don&#39;t depend on running in node or on a browser. As part of this
move we have <strong>deprecated appinfo.json</strong>: we now use <code>package.json</code> instead.
The latest version of the Pebble Tool can convert your project when you run
<code>pebble convert-project</code>. Old-style projects continue to be supported, but
cannot use the package manager.</p><p>For your convenience, we have provided some wrappers around npm functionality:</p>
<ul>
<li><code>pebble package install</code> to safely install a package.</li>
<li><code>pebble package uninstall</code> to uninstall a package.</li>
<li><code>pebble package login</code> to log in to or create your npm account.</li>
<li><code>pebble package publish</code> to publish your package to npm.</li>
</ul>
<p>We also have UI in CloudPebble to enter your dependencies.</p><p>You can browse the available packages on npm under the
<a href="https://www.npmjs.com/browse/keyword/pebble-package" title="" class="">pebble-package</a> keyword,
and read our guides on <a href="/jp_manual/guides/pebble-packages/using-packages/" title="" class="">using</a> and
<a href="/jp_manual/guides/pebble-packages/creating-packages/" title="" class="">creating</a> Pebble Packages.</p><p>I&#39;m looking forward to seeing what you make!</p>]]></content>
  </entry>
  
  <entry>
    <title type="html"><![CDATA[Time to Expand Our Core Business!!]]></title>
    <link href="http://pebble.lunarians.net/blog/2016/05/24/Kickstarter-3/"/>
    <updated>2016-05-24T00:00:00+00:00</updated>
    <id>http://pebble.lunarians.net/blog/2016/05/24/Kickstarter-3</id>
    <content type="html"><![CDATA[<p>You might have noticed a bit of a buzz around Pebble today - we have officially
launched our <strong><a href="https://pebble.com/kickstarter" title="" class="">third Kickstarter campaign</a></strong>,
and it is jam packed with exciting new products and features for developers to
explore and hack on. We have been hard at work not only creating the next
generation of health-focused smartwatches, but also refining what great wearable
user and developer experiences look like. We are introducing an entirely new
class of wearable device, and adding a modern JavaScript SDK that takes
advantage of the Web APIs JavaScript developers around the world know and love.</p><p>There is a lot to take in, so we’re here to help break down what’s new and
exciting for our favorite developer community!</p><h2 id="the-smartwatches" class="anchor">The Smartwatches</h2><p>We are introducing two new smartwatches designed to track and improve your
health, and simplify your life.</p><p><img src="/assets/images/blog/2016-05-24-kickstarter-3/smartwatches.png" alt="Pebble 2, and Time 2" />
<p class="blog__image-text">Pebble 2, and Time 2</p></p><p>Pebble 2 is a take on our classic Pebble that launched the smartwatch market in
2012. It includes updated hardware with a high contrast black and white display,
microphone, up to seven days battery life, plus activity, sleep and heart rate
tracking.</p><p>Time 2 takes everything our users love about the Pebble Time Steel, and
builds upon it. It offers the same ten day battery life, activity and sleep
tracking you’re used to, and adds a larger color display, a smaller bezel, and
heart rate tracking!</p><p>If you are looking to dive a bit deeper, we encourage you to check out our
updated <a href="/jp_manual/guides/tools-and-resources/hardware-information/" title="" class="">Hardware Information Guide</a>
below, and our <a href="https://github.com/pebble/pebble-3d" title="" class="">Pebble-3D GitHub repository</a>
that includes 3D drawings of all our smartwatches!</p>
<table class="centered-table hardware-info-table">
    <thead>
        <tr>
            <th>Company</th>
            <th colspan="4">Pebble Technology Corporation</th>
            <th colspan="2">Core Devices</th>
        </tr>
        <tr>
            <th>Model</th>
            <th>Classic,<br />Steel</th>
            <th nowrap="nowrap">Time,<br />Time Steel</th>
            <th>Time Round</th>
            <th>Pebble 2</th>
            <th nowrap="nowrap">Pebble 2 Duo</th>
            <th nowrap="nowrap">Pebble Time 2*</th>
        </tr>
    </thead>
    <tbody>
        <tr>
            <td>Platform</td>
            <td>Aplite</td>
            <td>Basalt</td>
            <td>Chalk</td>
            <td>Diorite</td>
            <td>TBD</td>
            <td>TBD</td>
        </tr>
        <tr>
            <td>SOC</td>
            <td><a href="https://www.st.com/en/microcontrollers-microprocessors/stm32f205re.html"
                    target="_blank">STMicro STM32F205RE</a></td>
            <td colspan="3"><a href="https://www.st.com/en/microcontrollers-microprocessors/stm32f411.html"
                    target="_blank">STMicro
                    STM32F411</a></td>
            <td><a href="https://www.nordicsemi.com/Products/nRF52840" target="_blank">Nordic nRF52840</a></td>
            <td><a href="https://www.sifli.com/en/node/31" target="_blank">SiFli SF32LB52J</a></td>
        </tr>
        <tr>
            <td>CPU</td>
            <td nowrap="nowrap">Cortex-M3<br />64 MHz</td>
            <td colspan="3">Cortex-M4<br />100 MHz</td>
            <td>Cortex-M4<br />64 MHz</td>
            <td>Cortex-M33<br />240 MHz</td>
        </tr>
        <tr>
            <td>Max Resource Size</td>
            <td>96k</td>
            <td colspan="3">256k</td>
            <td></td>
            <td></td>
        </tr>
        <tr>
            <td>Max App Size (code + heap)</td>
            <td>24k</td>
            <td colspan="3">64k</td>
            <td></td>
            <td></td>
        </tr>
        <tr>
            <td>Display Shape</td>
            <td colspan="2">Rectangle</td>
            <td>Round</td>
            <td colspan="3">Rectangle</td>
        </tr>
        <tr>
            <td>Display Size</td>
            <td nowrap="nowrap">1.26"</td>
            <td nowrap="nowrap">1.25"</td>
            <td nowrap="nowrap">1"</td>
            <td nowrap="nowrap" colspan="2">1.26"</td>
            <td nowrap="nowrap">1.5"</td>
        </tr>
        <tr>
            <td>Display Resolution</td>
            <td colspan="2">144 x 168</td>
            <td nowrap="nowrap">180 x 180</td>
            <td colspan="2">144 x 168</td>
            <td nowrap="nowrap">200 x 228</td>
        </tr>
        <tr>
            <td>Display PPI</td>
            <td>175</td>
            <td colspan="2">182</td>
            <td colspan="2">175</td>
            <td>202</td>
        </tr>
        <tr>
            <td>Display Colors</td>
            <td>2<br /><em>(B/W)</em></td>
            <td colspan="2">64<br /><em>(Color)</em></td>
            <td colspan="2">2<br /><em>(B/W)</em></td>
            <td>64<br /><em>(Color)</em></td>
        </tr>
        <tr>
            <td>Touch Screen</td>
            <td colspan="5">No</td>
            <td>Yes</td>
        </tr>
        <tr>
            <td>Backlight</td>
            <td colspan="5">White LED</td>
            <td colspan="1">Multicolor<br />RGB LED</td>
        </tr>
        <tr>
            <td>Heart Rate Monitor</td>
            <td>No</td>
            <td colspan="2">No<br /><em>(possible with smartstrap)</em></td>
            <td>Yes<br /><em>(except SE model)</em></td>
            <td>No</td>
            <td>Yes</td>
        </tr>
        <tr>
            <td>Microphone</td>
            <td>No</td>
            <td colspan="4">Yes</td>
            <td>Yes<br /><em>(with 2nd Mic for ENC<sup>*1</sup>)</em></td>
        </tr>
        <tr>
            <td>Speaker</td>
            <td colspan="4">No</td>
            <td colspan="2">Yes</td>
        </tr>
        <tr>
            <td>Sensors</td>
            <td colspan="3">Accelerometer, Compass</td>
            <td>Accelerometer</td>
            <td>6-axis IMU, Compass, Barometer</td>
            <td>6-axis IMU, Compass</td>
        </tr>
        <tr>
            <td>Buttons</td>
            <td colspan="6">4</td>
        </tr>
        <tr>
            <td>Vibration</td>
            <td colspan="4">ERM (eccentric rotating mass)</td>
            <td colspan="2">LRA (linear resonant actuator)</td>
        </tr>
        <tr>
            <td>Case Material</td>
            <td colspan="2">Polycarbonate <em>(P, PT)</em><br />Stainless Steel 316 <em>(PS, PTS)</em></td>
            <td>Stainless Steel 316</td>
            <td colspan="2">Polycarbonate</td>
            <td>Stainless Steel 316</td>
        </tr>
        <tr>
            <td>Lens Material</td>
            <td>Polycarbonate</td>
            <td>Gorilla Glass<br /><em>(curved)</em></td>
            <td colspan="2">Gorilla Glass<br /><em>(flat)</em></td>
            <td colspan="2">Hardened Glass<br /><em>(flat)</em></td>
        </tr>
        <tr>
            <td>Charging Port</td>
            <td>Power only</td>
            <td colspan="2">Smart accessory port</td>
            <td>Smart accessory port<br /><em>(data only)</em></td>
            <td colspan="2">Power only</td>
        </tr>
        <tr>
            <td>Battery Life</td>
            <td colspan="2">~7 days</td>
            <td>~2 days</td>
            <td>~7 days</td>
            <td colspan="2">~30 days</td>
        </tr>
        <tr>
            <td>Water Resistance</td>
            <td>5 ATM<sup>*2</sup><br /><em>(50 m)</em></td>
            <td>3 ATM<sup>*2</sup><br /><em>(30 m)</em></td>
            <td>None<br /><em>(Splash Resistant)</em></td>
            <td>3 ATM<sup>*2</sup><br /><em>(30 m)</em></td>
            <td colspan="2">TBD<br /><em>(target IPX8)</em></td>
        </tr>
        <thead>
            <tr>
                <th>Model</th>
                <th>Classic,<br />Steel</th>
                <th nowrap="nowrap">Time,<br />Time Steel</th>
                <th>Time Round</th>
                <th>Pebble 2</th>
                <th nowrap="nowrap">Pebble 2 Duo</th>
                <th nowrap="nowrap">Pebble Time 2*</th>
            </tr>
        </thead>
</table>

<div style="font-size: 0.9em; margin-top: 1em;">
    <p><sup>*1</sup> ENC = Environmental Noise Cancellation</p>
    <p><sup>*2</sup> Please note regarding water resistance:</p>
    <ul style="margin-top: 0; margin-bottom: 0;">
        <li>3 ATM &rarr; Safe for hand-washing, rain, splashes, and brief immersion, but not for
            swimming/diving.</li>
        <li>5 ATM &rarr; Safe for swimming in shallow water, showering, and snorkeling, but not for
            diving.</li>
        <br>
    </ul>
</div>
<h2 id="pebble-core" class="anchor">Pebble Core</h2><p>A lot of people like to call Pebble a ‘smartwatch’ company, but we’ve decided
it’s <em>Time</em> to prove them wrong, and expand our <em>Core</em> business with an entirely
new ultra-wearable!</p><p><img src="/assets/images/blog/2016-05-24-kickstarter-3/core.jpg" alt="Pebble Core" />
<p class="blog__image-text">Pebble Core</p></p><p>Pebble Core is an entirely new class of wearable device - it features 3G,
WiFi, Bluetooth, GPS, an accelerometer, two programmable buttons, a headphone
jack, and a hardware expansion port accessible to developers.</p><p><strong>Oh yeah, and it’s an open platform.</strong></p><p>Pebble Core is built on top of Android, but has the familiar Pebble
developer experience you’re used to. Pebble Core will be able to run the
PebbleKit JS component of watchapps, to ensure apps continue functioning when a
user leaves their mobile device at home. Additionally, developers will be able
to write standalone Pebble Core applications using an extended version of
PebbleKit JS, allowing you to customize the user experience depending on whether
or not the user has an attached Pebble smartwatch.</p><p>With Internet connectivity on the go, and programmatic access to GPS and
Bluetooth Low Energy, the possibilities are endless.</p>
<ul>
<li><em>Create an app to open your Internet-connected garage door with the click of a button, or order pizza to your current location.</em></li>
<li><em>Use geofencing to automatically notify your loved ones when you leave work or school.</em></li>
<li><em>Hook it up to your drone and send real time sensor and location information to your phone.</em></li>
</ul>
<p>We have a million ideas for Pebble Core, and we can’t wait for you to get your
hands on it and start hacking! We will be providing more information and news
around Pebble Core soon, so stay tuned!</p><h2 id="sdk-4-0-the-c-part" class="anchor">SDK 4.0 (The C Part)</h2><p>With the launch of Pebble 2 and Time 2 we will be releasing our next revision to
the operating system with Pebble OS 4.0. The new operating system includes an
updated user experience aimed at helping the user have access to the information
they need at a glance, and take quick, simple actions.</p><p>Let’s look at some of the new features in Pebble OS 4.0, and how you can take
advantage of them as a developer.</p><p>
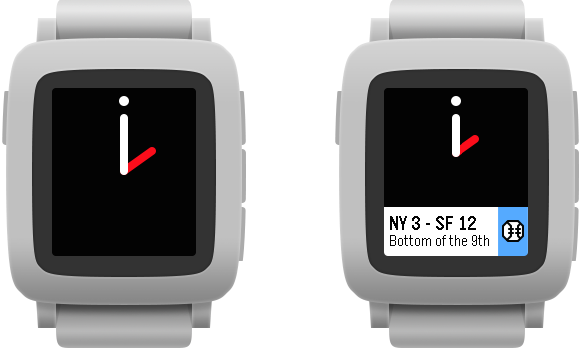
The most obvious change is that we have replaced timeline past with an updated
Launcher capable of displaying glanceable information through a new AppGlances
API. To help accommodate the removal of timeline past, we’ve updated the
behaviour of “Now” pins to allow them to persist into the future.</p><p><img src="/assets/images/blog/2016-05-24-kickstarter-3/launcher.gif" alt="Updated Launcher" class="pebble-screenshot pebble-screenshot--time-black">
<p class="blog__image-text">Preview version of updated launcher with AppGlances</p></p><p>Along with the updated launcher, we’re also helping users gain better insight
into what’s going on right now through a new feature called timeline quick view.
Timeline Quick View is a small notification displayed on the user’s watchface 
to let them know what’s happening right now, or coming up soon.</p><p><a href="/jp_manual/assets/images/blog/2016-05-24-kickstarter-3/peek.png" title="" class=""><img src="/assets/images/blog/2016-05-24-kickstarter-3/peek.png" alt="Timeline Quick View" /></a>
<p class="blog__image-text">Preview version of timeline quick view</p></p><p>The default behaviour for timeline quick view is to simply draw over the bottom 
of the watchface, however, developers will have access to a new set of APIs to 
manage how their watchface responds to timeline quick view events. SDK 4.0 will 
include APIs to find the “unobstructed area” of the display, and to react to 
timeline quick view being displayed, and hidden. Using these APIs, developers 
can create watchfaces that respond to timeline quick view, and programmatically 
adjust!</p><p>And of course, you’ll have programmatic access to the heart rate monitor through
an updated HealthService, capable of providing both real time, and historical
heart rate information.</p><h2 id="sdk-4-0-the-embedded-javascript-part" class="anchor">SDK 4.0 (The Embedded JavaScript Part)</h2><p>We’ve been hard at work enabling developers to write JavaScript applications
that run directly on our smartwatches. In a recent firmware release, we hit a
major milestone - we shipped a JavaScript version of the default watchface,
TicToc, and a Pebble-specific port of an
<a href="https://github.com/pebble/jerryscript" title="" class="">embedded JavaScript runtime</a> to power
it.</p><p>We believe that providing an embedded JavaScript SDK will make our platform more
accessible, powerful, and collaborative. Our JavaScript SDK will be based on
existing Standard Web APIs wherever possible - your display will be a
<a href="https://developer.mozilla.org/en-US/docs/Web/API/Canvas_API" title="" class="">Canvas</a>, your
watch and mobile device will communicate through a message-passing API similar
to <a href="https://developer.mozilla.org/en-US/docs/Web/API/Web_Workers_API/Using_web_workers" title="" class="">Web Worker</a>,
and you’ll access the compass and accelerometer through the
<a href="https://developer.mozilla.org/en-US/docs/Web/API/Detecting_device_orientation" title="" class="">Device Orientation</a>
API.</p><h2 id="this-is-real-really" class="anchor">This is Real (Really!)</h2><p>We’ll be shipping an early preview version of the 4.0 C SDK near the conclusion
of the Kickstarter campaign. The 4.0 C SDK will include preview APIs for
managing what information your watchapps display in the launcher, how your
watchfaces respond to timeline quick view events, and more.</p><p>Support for building and testing Pebble 2 and Time 2 watchapps and watchfaces
will be included in the first official SDK 4 release, tentatively scheduled for
July 2016.</p><p>Finally, the embedded JavaScript SDK is scheduled to ship later this summer. We
want to ensure that you have access to it before the first Pebble 2
smartwatches make it onto users’ wrists, so you have time to write the first
wave of Pebble 2 watchfaces in JavaScript!</p><h2 id="lets-meetup-irl" class="anchor">Let’s Meetup IRL</h2><p>If you’re local to San Francisco, we welcome you to join us at SF Geekdom on
June 15 at 6:00pm (more details to follow) to checkout our new hardware, and
learn more about what’s new, and how to best use it. If you are like the
majority of the world and don’t live in San Francisco, you’ll be able to access
a recording of our Meetup after the event so you can join in the fun and learn
what’s new!</p><p>If you run a Pebble Meetup, or are interested in running an event to bring
together Pebble Developers, let us know - we’d love to call-in, talk about
what’s new in SDK 4.0, and answer questions from your local community!</p><h2 id="we-need-you-to-make-this-happen" class="anchor">We Need You to Make This Happen</h2><p>We have worked hard to pack this Kickstarter with as many developer friendly
features and products as possible, and we hope you are as excited as we are!
We’re counting on your support to make all of this happen - so go treat yourself
to some awesome new Pebble products, and help us show the world what wearables
should look like!</p><p><a href="https://pebble.com/kickstarter">https://pebble.com/kickstarter</a></p>]]></content>
  </entry>
  
  <entry>
    <title type="html"><![CDATA[Guest Blog Post - PAL Smartstrap]]></title>
    <link href="http://pebble.lunarians.net/blog/2016/05/18/PAL-Smartstrap/"/>
    <updated>2016-05-18T00:00:00+00:00</updated>
    <id>http://pebble.lunarians.net/blog/2016/05/18/PAL-Smartstrap</id>
    <content type="html"><![CDATA[<p><em>This is a guest blog post from Powerstrap, the team behind Pal, a GPS and
battery extending smartstrap that launched on Kickstarter this week:</em></p><p><a href="https://www.kickstarter.com/projects/655382546/pal-strap-gps-and-extended-battery-strap-for-pebbl" title="" class="">kickstarter.com/projects/655382546/pal-strap-gps-and-extended-battery-strap-for-pebbl</a></p><p>Powerstrap is incredibly excited to share that our Kickstarter for the world’s
first GPS and battery Smartstrap for Pebble Time and Pebble Time Steel watches
is now live! We have been working very closely with Pebble to provide the best
strap for this amazing community since 2014 and the time (pun intended) is
finally here to share it with everyone!</p><h2 id="meet-pal" class="anchor">Meet Pal!</h2><p><img src="/assets/images/blog/2016-05-18-PAL-Smartstrap/pal.jpg" alt="Pal Smartstrap" /></p><p>It features a high performance, independent GPS that allows users to track
speed, distance, elevation, and route for up to 24 hours without the need for a
Smartphone. Begin your activity as soon as you go out, with no time wasted idly
waiting for a signal. Pal uses industry leading GPS (Qualcomm SiRF), which
provides quick signal pickup. It also extends the life of Pebble Time and Pebble
Time Steel for up to seven days and shares the same charger for hassle-free
charging. In cases of emergency, the Pal can be used as a battery back-up to the
Pebble. It also comes with a companion app for iOS and Android for GPS logs and
social media sharing.</p><h2 id="how-did-we-get-started-on-this-journey" class="anchor">How Did We Get Started On This Journey?</h2><p>We love our Pebbles and wanted to contribute to the community. I have been a
watchstrap creator, watch straps are my passion. I’ve found that they usually
don’t get the respect that they deserve in the creation process. So when I fell
in love with Pebble, I wanted to see what I could do to lend my expertise to
make the already amazing Pebble just that much more awesome. I took my
experience with watch straps, enlisted two great engineers CC and Edwin, whose
backgrounds are in electronics, mechanical engineering and the battery business.</p><p>One of the things that was so incredibly helpful, was being able to work hand in
hand with Pebble to make sure that our idea for a functional strap matched with
Pebble’s vision and community. They have been great partners in helping us
identify what would be of most use to the Pebble community, best practices, and
gave great feedback which helped us perfect the design. This relationship is not
unlike the relationship between the Pebble and Pal, both working together in
harmony to make something unique and great -- which actually helped inspire the
name Pal!</p><p><img src="/assets/images/blog/2016-05-18-PAL-Smartstrap/concept.png" alt="PAL Concept and Prototype" />
<p class="blog__image-text">Early concept drawing and battery buckle prototype</p></p><h2 id="so-how-does-it-work-exactly" class="anchor">So how does it work exactly?</h2><p>Let’s dive in deeper into the technical specification of the Pal Smartstrap. Pal
GPS architecture is powered by Qualcomm’s SiRF chipset, this chipset can track
speed, distance, and elevation as a standalone, offering an impressively fast
first time signal pickup within three minutes and it will continue to work even
if it goes indoors for a while, and then comes back outside. PAL also features data
storage for up to 24 hours of GPS data.</p><p><img src="/assets/images/blog/2016-05-18-PAL-Smartstrap/communication.jpg" alt="GPS Communication" /></p><p>Raw GPS data received from satellites are processed by Pal’s MCU and results are
pumped to Pebble for display and storage - allowing the smartwatch to leverage
GPS location data without the need to be connected to a mobile phone.</p><p>Per our efficient power management intelligence, Pal’s battery recharges
Pebble’s battery only when the user manually activates the function or when
Pebble’s battery drops to very low level and triggers auto-charging. Connecting
pins between the Pal and Pebble are surrounded by soft gasket. This structure
makes Pal water resistant, but it probably cannot withstand swimming or diving.
In any case, even if water goes between connecting pins, Pal’s electronic design
has protection measure and it won’t be damaged.</p><p><img src="/assets/images/blog/2016-05-18-PAL-Smartstrap/exploded-pal.jpg" alt="Exploded View of PAL" /></p><p><strong>Tech Specs:</strong> GNSS support: GPS only TTFF cold fix time: about 40 seconds
under open sky. Location fix time can be accelerated by AGPS (working in
progress with Qualcomm) Location hot fix: within 10 seconds. Certification
planned to be done upon campaign success and product launch: CE, FCC, IC Battery
technical Specs: Battery capacity: 250mAh Battery chemistry: Lithium Ion Polymer
Nominal Voltage: 3.8V Pebble Watch’s battery: can be charged from either PAL’s
internal battery or external charging port underneath PAL Internal battery of
PAL: charge up from charging port underneath PAL</p><h2 id="design" class="anchor">Design</h2><p>Together, the Pal and Pebble Time weigh only 65grams and offer users enhanced
functionality, without added weight or bulkiness. The interchangeable design
features a unique strap curvature that is ergonomically engineered to fit every
wrist size and it only takes seconds to pin the Smartstrap to the clasp to
customize the strap length.</p><h2 id="open-platform" class="anchor">Open Platform</h2><p>From the beginning, it was important that we kept Pal open so developers have
the opportunity to take the strap to the next level. We hope that by
incorporating the best in class hardware components into Pal, it will help
encourage app developers to be even more creative and limitless.</p><p>Obviously our first priority is getting fully funded so we can go to production,
however, we are currently starting communication with interested developers as
there are so many interesting and helpful potential ways that this technology
can be adapted. When we are fully funded, we will release our Pal strap API. How
we interact with developers moving forward will depend on the interest and size
of the group, however anticipate that the dev community on Pebble.com as a
likely option. If you have an idea for an app for the Pal, we would love to hear
from you and potentially support your development. Contacts us here:
<a href="mailto:pal@palstrap.com">pal@palstrap.com</a></p><p>We&#39;ve launched a Kickstarter to help bring PAL to life. We hope you will check
us out and support us at
<a href="https://www.kickstarter.com/projects/655382546/pal-strap-gps-and-extended-battery-strap-for-pebbl" title="" class="">kickstarter.com/projects/655382546/pal-strap-gps-and-extended-battery-strap-for-pebbl</a></p>]]></content>
  </entry>
  
  <entry>
    <title type="html"><![CDATA[Pebble.js Support for Chalk!]]></title>
    <link href="http://pebble.lunarians.net/blog/2016/05/16/Pebble-JS-Round/"/>
    <updated>2016-05-16T00:00:00+00:00</updated>
    <id>http://pebble.lunarians.net/blog/2016/05/16/Pebble-JS-Round</id>
    <content type="html"><![CDATA[<p>After many morning coding sessions on the weekends,
<a href="/jp_manual/docs/pebblejs/" title="" class="">Pebble.js</a> has been updated to
support the Chalk platform (Pebble Time Round). This update is available in
<a href="" title="" class="">CloudPebble</a>, and ready for you to work with right in
your browser with no setup!</p><p>Supporting Chalk required a ton of bug crushing to become compatible with the
new 3.0 style status bar, changes to accommodate reduced memory on the 3.x
Aplite platform, adding new features such as text flow and paging, and making it
easier to target multiple platforms by adding a feature detection API.</p><p><img src="/assets/images/blog/2016-05-13-pebble-js-round/pebblejs.png" alt="Pebble.js Screenshots" />
<p class="blog__image-text">Pebble.js running on all available platforms.</p></p><p>Whether or not you’re targeting the Chalk platform, there are many new features
for you to explore in this update - and simply recompiling your project with the
latest version of Pebble.js will update the look and feel through refined
spacing between text fields.</p><p>The background color of window&#39;s status bar can now be changed, allowing it to
blend in with the app&#39;s background in a similar way to Pebble&#39;s Music app.</p><div class="highlight"><pre><span></span><span class="kd">var</span><span class="w"> </span><span class="nx">defaultBackgroundColor</span><span class="w"> </span><span class="o">=</span><span class="w"> </span><span class="s1">'white'</span><span class="p">;</span>
<span class="kd">var</span><span class="w"> </span><span class="nx">defaultColor</span><span class="w"> </span><span class="o">=</span><span class="w"> </span><span class="s1">'black'</span><span class="p">;</span>

<span class="kd">var</span><span class="w"> </span><span class="nx">card</span><span class="w"> </span><span class="o">=</span><span class="w"> </span><span class="ow">new</span><span class="w"> </span><span class="nx">UI</span><span class="p">.</span><span class="nx">Card</span><span class="p">({</span>
<span class="w">  </span><span class="nx">backgroundColor</span><span class="o">:</span><span class="w"> </span><span class="nx">defaultBackgroundColor</span><span class="p">,</span>
<span class="w">  </span><span class="nx">status</span><span class="o">:</span><span class="w"> </span><span class="p">{</span>
<span class="w">    </span><span class="nx">color</span><span class="o">:</span><span class="w"> </span><span class="nx">defaultColor</span><span class="p">,</span>
<span class="w">    </span><span class="nx">backgroundColor</span><span class="o">:</span><span class="w"> </span><span class="nx">defaultBackgroundColor</span>
<span class="w">  </span><span class="p">}</span>
<span class="p">});</span>

<span class="nx">card</span><span class="p">.</span><span class="nx">show</span><span class="p">();</span>
</pre></div><p>Two new elements were added,
<a href="/jp_manual/docs/pebblejs/#line" title="" class="">Line</a> and
<a href="/jp_manual/docs/pebblejs/#radial" title="" class="">Radial</a>, and all elements
now include <a href="/jp_manual/docs/pebblejs/#element-
borderwidth- width" title="" class="">borderWidth</a>, <a href="/jp_manual/docs/pebblejs
/#element- bordercolor-color" title="" class="">borderColor</a> and
<a href="/jp_manual/docs/pebblejs/#element-
backgroundcolor-color" title="" class="">backgroundColor</a> properties (except <code>Line</code>, which uses
<a href="/jp_manual/docs/pebblejs/#line-strokewidth-
width" title="" class="">strokeWidth</a> and <a href="/jp_manual/docs/pebblejs/#line-
strokecolor-color" title="" class="">strokeColor</a> instead).</p><p>There are many bugfixes as well. Scrolling is no longer jittery for cards and
menus, the status bar will no longer disappear upon changing windows that both
requested to have a status bar, and large bodies of text are truncated in cards
instead of just not showing up.</p><p>There is one new known issue - which causes some applications with heavy memory
usage to crash. If you&#39;re experiencing this issue, we would appreciate you
adding more details to <a href="https://github.com/pebble/pebblejs/issues/161" title="" class="">#161</a>.</p><p>This update also comes with two new guides to help familiarize yourself with the
exciting new world of round and colorful apps. <a href="/jp_manual/docs/pebblejs/#using-color" title="" class="">Using
Color</a> will help you
understand all the different ways you can specify which color you want your text
(and other elements) to be, and how you would go about styling your app with
color. <a href="/jp_manual/docs/pebblejs/#using-
feature" title="" class="">Using Feature</a> will help you understand the new Feature API, how it can be used to
specify different behaviours and UIs depending on what platform you&#39;re running
on, and what features it includes.</p><h2 id="cloudpebble" class="anchor">CloudPebble</h2><p>Enabling Chalk support in CloudPebble is simple. Open your project&#39;s &quot;Settings&quot;
screen, check the &quot;Build Chalk&quot; box, then recompile your project.</p><p><img src="/assets/images/blog/2016-05-13-pebble-js-round/settings.png" alt="CloudPebble Settings Screen" />
<p class="blog__image-text">Cloud Pebble Settings Screen.</p></p><p>To run your project on CloudPebble&#39;s Chalk emulator, compile your project, then
open the &quot;Compilation&quot; sceen, and select &quot;Emulator&quot; then &quot;Chalk.&quot;</p><h2 id="pebble-tool-+-local-sdk" class="anchor">Pebble Tool + Local SDK</h2><p>If you&#39;re using the Pebble Tool and local SDK, you&#39;ll need to merge the <code>master</code>
branch of the Pebble.js repositoroy into your project, then edit the
<code>appinfo.json</code> file to include <code>chalk</code> in the <code>targetPlatforms</code> array.</p><div class="highlight"><pre><span></span>{
  "uuid": "8e02b5f5-c0fb-450c-a568-47fcaadf97eb",
  "shortName": "Test",
  "longName": "Test Application",
  "companyName": "#makeawesomehappen",
  "versionLabel": "0.1",
  "sdkVersion": "3",
  "enableMultiJS": true,
  "targetPlatforms": ["aplite", "basalt", "chalk"],
  "watchapp": {
    "watchface": false
  },
  "appKeys": { },
  "resources": { }
}
</pre></div><p>To run your project with command line emulator, compile your project, then
install it to the Chalk emulator:</p><div class="highlight"><pre><span></span>&gt; pebble clean
&gt; pebble build &amp;&amp; pebble install --emulator=chalk --logs
</pre></div><p>Remember, we’re also working on supporting native JavaScript applications on
Pebble smartwatches, and are calling it
<a href="https://pebble.github.io/rockyjs/" title="" class="">Rocky.js</a>. Rest assured, I will continue to
maintain Pebble.js, and you can continue to develop and ship apps with it! Keep
an eye out on future developments by following the <a href="https://github.com/pebble/pebblejs" title="" class="">GitHub
repository</a> and checking out the latest
commits.</p><p>Let us know abour Pebble.js project or anything else you feel like mentioning,
by shouting on Twitter to <a href="https://twitter.com/pebbledev" title="" class="">@PebbleDev</a>,
<a href="https://twitter.com/pebble" title="" class="">@Pebble</a> or even myself
<a href="https://twitter.com/meiguro" title="" class="">@Meiguro</a>.</p><p>Here’s to more exciting weekend coding sessions in the future for both of us!</p>]]></content>
  </entry>
  
  <entry>
    <title type="html"><![CDATA[Guest Blog Post - Learning C with Pebble, The Book]]></title>
    <link href="http://pebble.lunarians.net/blog/2016/05/11/Learning-C-with-Pebble-The-Book/"/>
    <updated>2016-05-11T00:00:00+00:00</updated>
    <id>http://pebble.lunarians.net/blog/2016/05/11/Learning-C-with-Pebble-The-Book</id>
    <content type="html"><![CDATA[<p><em>This is a guest blog post from Mike Jipping, professor of Computer Science at
Hope College (Michigan, USA), who has been writing an open source book which
teaches the C programming language using Pebble smartwatches.</em></p><p>If you want to learn to program using the C programming language, you have lots
of choices. C has been around a while, so there are many textbooks and lots of
Web sites that have information on the language. Most are very general, with
examples and projects that you could run on any general purpose computer. Very
few are tailored to embedded systems and none are targeted at smartwatches,
until now, that is.</p><p>Pebble has teamed up with a college professor and a group of Pebble community
developers to produce <a href="http://pbl.io/cbook" title="" class="">Learning C with Pebble</a>, an online,
open source textbook that teaches C with examples and projects focused on
Pebble smartwatches.</p><p><img src="/assets/images/blog/06052015-book-cover.png" alt="book-cover" /><br /></p><p>In order to build apps for Pebble smartwatches, a developer needs to program in
one of two languages: JavaScript or C. Of the two, you might choose JavaScript
for some familiar features, but C might be the better choice since it produces
apps that run more efficiently and perform with better speed than those written
in JavaScript.</p><p>The book is a textbook: it teaches how to program using the C programming
language. But it is very unique among textbooks.</p>
<ul>
<li>It is free, online, and open source. You can have your own copy for free.
You can read it online or download the PDF or ePub versions.</li>
<li>It is written with Markdown formatting. This means you can fork the book&#39;s
source, edit it or add new content in Markdown, and submit a pull request to
have your changes added to the book.</li>
<li>It represents a work in progress. The online version will be updated to
reflect error corrections and new content. Sections of the book will be
released in intervals.</li>
</ul>
<p>In addition to these unique features, <em>Learning C with Pebble</em> comes with
Project Exercises at the end of each chapter. Lots of C books include questions
or small exercises to work on with each chapter. This book has &quot;project&quot;
exercises: complete Pebble smartwatch applications that give you code to start,
ask you to make changes, and give you a solution so you can compare your answer
to others. It encourages you to work in focused code that runs on a Pebble and
helps you learn C in an environment that is targeted to Pebble programming.</p><p>In addition to learning the topics in each chapter, these Project Exercises help
you learn the Pebble programming system and the scaffolding that apps for Pebble
need to run.  You learn Pebble code in a way that helps you to become
comfortable with the runtime environment and with unfamiliar code.  And you
learn C along the way.</p><p>This book is written by Mike Jipping, a professor of Computer Science at Hope
College in Holland, Michigan, USA.  Mike has been writing apps for handheld
computers, smartphones, and wearable devices for over 30 years. He has developed
several apps for Pebble smartwatches. The Pebble community developers who are
helping out with the book are <a href="https://twitter.com/allanf175" title="" class="">Allan Findlay</a>,
<a href="https://twitter.com/NiVZ" title="" class="">Paul Niven</a>, <a href="https://twitter.com/mydogsnowy" title="" class="">Mathew
Reiss</a>, <a href="https://twitter.com/dabdemon" title="" class="">David Rodriguez
Rincon</a>, and <a href="https://twitter.com/robisodd" title="" class="">Rob
Spiess</a>. Everyone is active in the Pebble
developer community, in the forums, and on Slack.</p><p>The book can be found at <a href="http://pbl.io/cbook">http://pbl.io/cbook</a>. The first 8 chapters have been
released with the remainder of the book will be coming out over the coming
summer. This is a readable book, packed with examples and code and projects.
It&#39;s a great way to learn the C programming language on Pebble smartwatches.</p><p>We&#39;d appreciate your feedback, be sure to tweet <a href="https://twitter.com/PebbleDev" title="" class="">@PebbleDev</a> on Twitter or find us on
<a href="https://discordapp.com/invite/aRUAYFN" title="" class="">Discord</a>.</p>]]></content>
  </entry>
  
  <entry>
    <title type="html"><![CDATA[Guest Blog Post - Pebble Powered Instruments at GrizzHacks]]></title>
    <link href="http://pebble.lunarians.net/blog/2016/04/27/jeremy-karbowski-grizzhacks/"/>
    <updated>2016-04-27T00:00:00+00:00</updated>
    <id>http://pebble.lunarians.net/blog/2016/04/27/jeremy-karbowski-grizzhacks</id>
    <content type="html"><![CDATA[<p><em>This is a guest blog post from <a href="https://github.com/jkarbows" title="" class="">Jeremy Karbowski</a>, who created a theremin-like gesture based instrument for the Pebble smartwatch at <a href="http://grizzhacks.com" title="" class="">GrizzHacks 2016</a>.</em></p><p>Hackathons are wonderful. The three I&#39;ve attended thus far have been amazing opportunities to learn new technologies and work with other hackers to bring an idea to life. Hackathons embody some of the pure magical joy of computing that make your eyes light up with new ideas, and they provide an opportunity for participants to work with hardware and resources that they may not have had access to otherwise.</p><p><a href="/jp_manual/assets/images/blog/2016-04-26-pebble-theremin/working_full.png" title="" class=""><img src="/assets/images/blog/2016-04-26-pebble-theremin/working.png" alt="Prototyping" /></a>
<p class="blog__image-text">Working on the prototype during GrizzHacks</p></p><p>When I showed up to GrizzHacks I had no idea what I wanted to make, but I knew I wanted to explore some of the new hardware that was provided by the organizers, and the Pebble smartwatch and <a href="https://www.myo.com/" title="" class="">Myo armband</a> immediately stuck out as bursting with potential. I remembered a project from a past hackathon that used the Myo wristband to control a string of colored lights based on the user’s movement, and was impressed by the expressive potential that gesture-based input suggested. I wanted to explore that.</p><p>Our minds simultaneously inhabit physical and virtual spaces, switching between the two constantly throughout the day. Using movement and gesture-based technology for control draws these spaces closer together, providing a stronger connection between the two worlds and enabling expressive and emotional interactions with virtual spaces through technology.</p><p>One of the best ways to translate and express emotion is through music, and I realized that with the gesture recognition of the Myo and the accelerometer packed inside of the Pebble I could create an instrument that allowed for musical expression through the motion of the device in a way similar to the <a href="https://en.wikipedia.org/wiki/Theremin" title="" class="">theremin</a>.</p><p>Now that I had my idea, I just needed to build it. I created a system to stream hardware sensor data to a Node.js server and a web front-end that listeners can connect to from anywhere in the world. Here, streaming sensor data is converted to synthesizer modulations done in-browser by a web audio synth. Movements on different axes were meant to control different parameters of the synthesizer, such as frequency and amplitude. Pebble made this task a dream - the hardware worked beautifully, and I was able to transfer accelerometer data over a websocket connection with ease.</p><div class="highlight"><pre><span></span><span class="c1">// Simplified Pebble JS code</span>
<span class="kd">var</span><span class="w"> </span><span class="nx">UI</span><span class="w"> </span><span class="o">=</span><span class="w"> </span><span class="nx">require</span><span class="p">(</span><span class="s1">'ui'</span><span class="p">);</span>
<span class="kd">var</span><span class="w"> </span><span class="nx">Accel</span><span class="w"> </span><span class="o">=</span><span class="w"> </span><span class="nx">require</span><span class="p">(</span><span class="s1">'ui/accel'</span><span class="p">);</span>
<span class="kd">var</span><span class="w"> </span><span class="nx">ws</span><span class="w"> </span><span class="o">=</span><span class="w"> </span><span class="ow">new</span><span class="w"> </span><span class="nx">WebSocket</span><span class="p">(</span><span class="s1">'ws://boiling-fjord-40795.herokuapp.com/'</span><span class="p">);</span>

<span class="nx">Accel</span><span class="p">.</span><span class="nx">on</span><span class="p">(</span><span class="s1">'data'</span><span class="p">,</span><span class="w"> </span><span class="kd">function</span><span class="p">(</span><span class="nx">e</span><span class="p">)</span><span class="w"> </span><span class="p">{</span>
<span class="w">  </span><span class="nx">ws</span><span class="p">.</span><span class="nx">send</span><span class="p">(</span><span class="nb">JSON</span><span class="p">.</span><span class="nx">stringify</span><span class="p">(</span><span class="nx">e</span><span class="p">.</span><span class="nx">accel</span><span class="p">));</span>
<span class="p">});</span>

<span class="nx">ws</span><span class="p">.</span><span class="nx">onclose</span><span class="w"> </span><span class="o">=</span><span class="w"> </span><span class="kd">function</span><span class="p">()</span><span class="w"> </span><span class="p">{</span>
<span class="w">  </span><span class="nx">Accel</span><span class="p">.</span><span class="nx">on</span><span class="p">(</span><span class="s1">'data'</span><span class="p">,</span><span class="w"> </span><span class="kd">function</span><span class="p">(</span><span class="nx">e</span><span class="p">)</span><span class="w"> </span><span class="p">{</span><span class="w"> </span><span class="cm">/* do nothing */</span><span class="w"> </span><span class="p">});</span>
<span class="p">};</span>
</pre></div><p>After ~20 hours of fiddling with server configurations and synth modules I had a working prototype. A few tweaks to the sensitivity/responsiveness (that feel much better in newer builds) and it was ready to present. Things weren’t perfect, but such is the nature of a hackathon. Larger and excited motions would cause synthesizer values to fluctuate wildly, creating an audio stream that sounded something like a dial-up connection. As a result, I believe I may have the honor of saying that I&#39;m the first person to perform dial-up on stage. The positive response was amazing, the crowd loved it. So much so that I hurried off-stage in a rush of excitement and thanks, forgetting to speak to the very real future of the project.</p><p><a href="/jp_manual/assets/images/blog/2016-04-26-pebble-theremin/demoing_full.png" title="" class=""><img src="/assets/images/blog/2016-04-26-pebble-theremin/demoing.png" alt="Live Demo" /></a>
<p class="blog__image-text">Demoing the instrument to a live audience</p></p><p>Work has begun on expanding the project. The web app design makes it trivial to connect multiple users all playing separate instruments, enabling multi-user performances with each participant playing remotely from anywhere in the world. The viewer end of the interface is modeled as a visualization of a garden, with viewers represented as flowers in the garden and performers as bouncing balls of light. Viewers can chat through a common interface, help shape the current performance through their interaction, as well as record, play back, and share performances.</p><p><a href="/jp_manual/assets/images/blog/2016-04-26-pebble-theremin/testing_full.png" title="" class=""><img src="/assets/images/blog/2016-04-26-pebble-theremin/testing.png" alt="Test Interface" /></a>
<p class="blog__image-text">Garden&#39;s demo interface</p></p><p>Development has begun on a new instrument interface powered by an Android application. The app works similarly to the interface created for the Pebble - streaming sensor data from the phone to the web app, with additional concerns and design changes due to the weight of the phone and the addition of a touch screen. The differences in the two will make for two distinctly different instruments with similarly intuitive styles of control, enabling users to join together for collaborative, physically-based musical performances.</p><p>Huge thanks to the people at Pebble for their great piece of wearable tech and for being all-around awesome. This couldn’t have happened without their awesome documentation and support. I&#39;m incredibly excited for the future of this project. It’s been a blast to work on so far, and I hope you&#39;ll join me later this summer when the new version of the site goes live for testing! If you’re interested, you can find more information about the project (including it’s source) on <a href="https://hackaday.io/project/10876-garden" title="" class="">hackaday.io</a>  and follow me on Twitter <a href="https://twitter.com/JeremyKarbowski" title="" class="">@JeremyKarbowski</a> where I occasionally post about the projects I’m working on.</p>]]></content>
  </entry>
  
  <entry>
    <title type="html"><![CDATA[Guest Blog Post - Introducing KiezelPay!]]></title>
    <link href="http://pebble.lunarians.net/blog/2016/04/06/KiezelPay/"/>
    <updated>2016-04-06T00:00:00+00:00</updated>
    <id>http://pebble.lunarians.net/blog/2016/04/06/KiezelPay</id>
    <content type="html"><![CDATA[<p><em>This is a guest blog post from <a href="https://www.kiezelwatchfaces.com/" title="" class="">Kiezel&#39;s</a> Kristof (in Belgium) and Jaron (in the US), who recently opened their KiezelPay payments platform to all Pebble developers! We&#39;re super excited to see how it will be used and adopted! You can find a list of KiezelPay Powered <a href="https://apps.getpebble.com/en_US/collection/kiezelpay/watchapps" title="" class="">watchapps</a> and <a href="https://apps.getpebble.com/en_US/collection/kiezelpay/watchfaces" title="" class="">watchfaces</a> in Pebble&#39;s appstore.</em></p><p><a href="https://kiezelpay.com" title="" class="">KiezelPay</a> was designed to help developers sell their apps and watchfaces for the Pebble smartwatch as easily, securely, and globally as possible. We learned a lot when we created a payment system for our Kiezel Watchfaces, and we wanted to improve that system and open it to all developers!</p><p><strong>We strongly believe you deserve to get paid.</strong></p><p>As a team we felt that bringing a solid payment system to the Pebble ecosystem would not only increase developer interest but also bring a much greater quality of apps and watchfaces to Pebble users.</p><h2 id="how-does-it-work" class="anchor">How Does it Work?</h2><p>KiezelPay apps have 3 possible statuses - unlicensed, trial, and licensed.</p><p>When the app is compiled with the trial setting enabled, it will check its status on our server as soon as the KiezelPay library is initialized for the first time after a clean install - otherwise, the app will check its status when told to do so by the developer (e.g. <a href="http://apps.getpebble.com/en_US/application/54e69569ad38b6399f000017" title="" class="">PinyWings</a> checks for the app&#39;s status after the first level, allowing users to play the first level before purchasing the game).</p><p><a href="/jp_manual/assets/images/blog/2016-04-05-kiezelpay/kiezelpay.png" title="" class=""><img src="/assets/images/blog/2016-04-05-kiezelpay/kiezelpay.png" alt="KiezelPay Flow" /></a></p><p>The diagram above describes the flow of communication between the Pebble app and the KiezelPay servers, including what it looks like when the optional &#39;trial&#39; and &#39;periodic rechecks after purchase&#39; features are enabled.</p><h2 id="why-use-kiezelpay" class="anchor">Why Use KiezelPay?</h2><p>KiezelPay is secure, simple to integrate, and jam packed with features like trial based apps and watchfaces, discount/promo codes, a day-­to-­day sales dashboard, worldwide transactions, and handles international taxes with ease!</p><h3 id="security" class="anchor">Security</h3><p>The first thing that comes to mind when thinking about a payment system is security. Whatever solution we created, we knew it had to be difficult to manipulate the system into giving away free usage of the app, and that the payments should be performed in a secure and trustworthy environment.</p><p>We ensure that all vital information and critical security checks happen in the application&#39;s C code, and that all communication with the KiezelPay servers use checksums, app secrets, and <a href="https://en.wikipedia.org/wiki/Cryptographic_nonce" title="" class="">nonces</a> to help secure the system.</p><p><em>We put a lot of effort into securing our platform, and if you would like to learn more we invite you to contact us at <a href="mailto:support@kiezelpay.com" title="" class="">support@kiezelpay.com</a>.</em></p><h3 id="taxes-legal" class="anchor">Taxes/Legal</h3><p>International tax laws are becoming increasingly difficult to handle. Many governments have noticed that the digital goods sector is growing rapidly, and they are losing a lot of money because foreign companies can sell their digital goods with easy without having to pay local sales tax.</p><p>For these reasons, the EU recently changed their digital goods tax system, which now requires everyone to charge VAT to anyone from the EU buying digital goods from them, regardless of where the company/person selling those goods is located, and regardless of the amount sold... and many more countries are either following suit, or creating new tax requirements for digital goods of their own.</p><p>Trying to stay on top of tax requirements is an insurmountable burden for a single developer that just wants to make a few bucks selling their apps. At KiezelPay, we have spent an enormous amount of time with international accountants and lawyers to ensure we&#39;re compliant with current international taxes and laws - not only for accepting payments, but getting the developer paid legally and correctly in a timely manner.</p><h3 id="ease-of-integration" class="anchor">Ease of Integration</h3><p>Pebble goes to great lengths to make their development platform accessible to new and experienced developers alike, and we wanted to ensure our platform was the same. An average developer should be able to setup KiezelPay and integrate it into their app in about an hour.</p><p>Once a developer creates a product in KiezelPay, they can download a pre-built watchface that includes the KiezelPay integration that has been configured for the product they just setup!</p><h3 id="features" class="anchor">Features</h3><p>Our KiezelPay platform currently offers you the following features:</p>
<ul>
<li><strong>Trial usage</strong>: You, as the developer, can choose if you want to allow users to test your app before purchasing by having a trial period. With a simple setting in your KiezelPay account, you can enable/disable trials, and define how long they last. After the trial is expired, the user will be required to purchase to continue.</li>
<li><strong>Discounts</strong>: Want to reward that user that helped you hunt down a hard to find bug with a free license or have a holiday specific pricing? No problem! Our system allows you to create all kinds of discounts for every situation: percentage based or fixed amount, one time valid or during a specific period in time, with code or for anyone that purchases, etc.</li>
<li><strong>Dashboard</strong>:​ Your KiezelPay account will show you all kinds of information about your apps. You can see a nice graph with your day­-to-­day income, easily see how much money you have made in total, how much you will receive at the next payout, and when that payout will happen.</li>
<li><strong>Purchase History</strong>: We made it easy to find any of your customers to reach out to them, see information about when they purchased the app, and what may have gone wrong during failed purchases.</li>
<li><strong>Test mode</strong>: By changing a single define in the KiezelPay library header file, you can run your app in test mode, allowing you to test the complete KiezelPay purchase process without having to pay for real.</li>
</ul>
<h2 id="the-future" class="anchor">The Future!</h2><p>Kiezel is always looking to improve KiezelPay and would love any feedback you may have. We plan to improve KiezelPay in the coming weeks by adding the following:</p>
<ul>
<li>Acceptance of Credit/Debit Card transactions</li>
<li>New dashboard analytics and graphs</li>
<li>Developer initiated refunds</li>
<li>Support for selling complete packages of apps/faces instead of only single
apps/faces</li>
<li>In­-app purchases</li>
<li>And even more!</li>
</ul>
<p>KiezelPay is officially now live and open to all developers to sign up for free. To sign up visit our site at <a href="https://kiezelpay.com" title="" class="">KiezelPay.com</a>, and join the <a href="https://discord.gg/zbqrxh8" title="" class="">KiezelPay Discord server</a>.</p><p>We hope you enjoy what we’ve created!</p><p>Kristof Verpoorten &amp; Jaron Pulver</p><p>KiezelPay LLC</p>]]></content>
  </entry>
  
  <entry>
    <title type="html"><![CDATA[Developer Relations Team Update]]></title>
    <link href="http://pebble.lunarians.net/blog/2016/03/29/developer-relations-team-update/"/>
    <updated>2016-03-29T00:00:00+00:00</updated>
    <id>http://pebble.lunarians.net/blog/2016/03/29/developer-relations-team-update</id>
    <content type="html"><![CDATA[<p>If you have been following Pebble in the news, you have likely seen that there have been some recent changes to the Pebble Team. We wanted to take a moment to acknowledge the #awesome work that has gone into getting our developer program to where it is today, and introduce you to the (somewhat) new faces of Pebble&#39;s Developer Relations team!</p><p><img src="/assets/images/blog/developer-relations-team-update/retreat.jpg" alt="2015 Developer Retreat" />
<p class="blog__image-text">The 2015 Developer Retreat - Bringing the Pebble Dev Team together with the Pebble Community!</p></p><p>The Developer Relations team is responsible for overseeing Pebble&#39;s developer program, managing documentation and events, listening to and advocating for our community&#39;s needs, and creating a safe, welcoming and empowered community of Pebble developers. It&#39;s a big job - and we are incredibly lucky and grateful to be able to continue the work of the brilliant and compassionate team that came before us!</p><p>And now to introduce you to the (somewhat) new faces of Developer Relation: Cat and Jon!</p><p><img src="/assets/images/blog/developer-relations-team-update/faces.png" alt="Cat and Jon" />
<p class="blog__image-text">Cat &amp; Jon (with special guest appearance by Jess the dog)</p></p><p>Cat Haines joined Pebble in October 2015, and has been helping with a lot of the behind the scenes work for Pebble&#39;s Developer Relations team. Cat enjoys tinkering with hardware and JavaScript (so naturally she&#39;s excited about <a href="https://github.com/pebble/rockyjs" title="" class="">Rocky</a>), crafting, and trying her best to keep a variety of house plants alive. You can follow her antics on <a href="https://twitter.com/_cathaines" title="" class="">Twitter</a>, <a href="https://github.com/cat-haines" title="" class="">GitHub</a>, and her <a href="http://cathaines.com" title="" class="">personal blog</a>.</p><p>Jon Barlow joined Pebble in September 2015. He is a champion Kickstarter backer and has been a longstanding community member and forum moderator. You may remember him from such apps as <a href="https://apps.getpebble.com/en_US/application/52b231c2b70e1c159500009b" title="" class="">91 Dub</a> and <a href="https://apps.getpebble.com/en_US/application/55a4b474e6f909512b0000a5" title="" class="">The Day Today</a>. Jon has spent many years volunteering and helping people within the Pebble community and is looking forward to continuing this role as his day job. Jon works for Pebble remotely from the UK and you can find him on <a href="https://twitter.com/orviwan" title="" class="">Twitter</a> and <a href="https://github.com/orviwan" title="" class="">GitHub</a>.</p><p>We have some exciting updates in the works - including introductions to some of the other well know (and loved) developer facing teams at Pebble. We can&#39;t wait to share what&#39;s coming up - so stay tuned, and if you have any questions, you can always find Cat (@cat) or Jon (@orviwan) on Pebble&#39;s Slack channel.</p><p>Happy Hacking!</p>]]></content>
  </entry>
  
  <entry>
    <title type="html"><![CDATA[Don't Panic - We're Here to Guide You]]></title>
    <link href="http://pebble.lunarians.net/blog/2016/03/09/Dont-Panic-We-Are-Here-To-Guide-You/"/>
    <updated>2016-03-09T00:00:00+00:00</updated>
    <id>http://pebble.lunarians.net/blog/2016/03/09/Dont-Panic-We-Are-Here-To-Guide-You</id>
    <content type="html"><![CDATA[<p>New developers typically begin their journey by following our tutorials, and
then moving on to projects of their own. The guides section of our documentation
is intended to help developers go beyond the basics - to help understand some of
the more complex APIs and concepts required to develop a Pebble app. Ultimately,
we want developers to feel comfortable enough with our platform that the
reference documentation can be their primary source of information.</p><p>We’ve known for a while that our guides section was a bit of a weak link (sorry
for the inconvenience!) - and to that end, we’ve spent a lot of time thinking
about, and writing, a new set of guides that should help to better guide you
along your path to becoming an awesome Pebble developer!</p><h2 id="what-did-we-do" class="anchor">What Did We Do?</h2>
<ul>
<li><p>We’ve restructured the <a href="/jp_manual/guides/toc" title="" class="">Table of Contents</a> and how we organize
guides to make it easier to find the information you’re looking for.</p></li>
<li><p>We’ve substantially improved our <a href="/jp_manual/guides/communication" title="" class=""><em>Communication</em></a>
guides (i.e. AppMessages, Datalogging, etc), which we’ve found to be one of
the concepts new developers struggle with the most.</p></li>
<li><p>We’ve added a new <a href="/jp_manual/guides/best-practices" title="" class=""><em>Best Practices</em></a> section to help
you take your apps to the next level by introducing concepts such as creating
low power apps and watchfaces, and suggestions on how to organize larger
projects.</p></li>
<li><p>We’ve created guides around 
<a href="/jp_manual/guides/appstore-publishing" title="" class=""><em>Appstore Publishing</em></a> to help you get your hard
work into the hands (onto the wrists?) of others.</p></li>
<li><p>We’ve added new guides for
<a href="/jp_manual/guides/graphics-and-animations/vector-graphics" title="" class=""><em>Pebble Draw Commands</em></a>, and
more areas of Pebble development.</p></li>
</ul>
<h2 id="why-did-we-do-it" class="anchor">Why Did We Do It?</h2><p>Some of the older guides, as well as the overall structure of this section of
our site, have been around for a long time. While seasoned developers are likely
familiar with where they can find various tidbits of buried information, more
recent additions to the Pebble developer family often struggle to find the
information they need.</p><p>But we haven’t just updated how we organize our guides - we’ve also taken this
opportunity to update some of the best practices (and language) used throughout
the guides. We’ve learned a lot over the past few years, and it’s safe to say
we’re all better at this than we were when the guides were first published.</p><h2 id="how-did-we-do-it" class="anchor">How Did We Do It?</h2><p>The old set of categories was introduced in 2014. Since then we have seen the
addition of new content for SDK 3.x, Pebble timeline, Design and Interaction,
Smartstraps, and other smaller additions. When we started this project, we had a
total of 79 guides in 20 different nested categories. After brainstorming what
information should be kept as is, improved, added, and dropped, we ended up with
a set of 64 guides across 13 categories.</p><p>After the drafts were agreed upon, we set to work with the task of writing the
actual content, using a combination of the existing content and an appreciation
of the most common questions and problems raised by our developer community.</p><p>With all of the new content in place, the final task was to shore up the
improved version of the developer site. Links were checked, and redirects were
created for all of the old guides - so if you have any favourite guides that
you’ve bookmarked they should automagically take you to the appropriate section
in the new guides.</p><p>In total, the project resulted in 16,467 lines added and 18,386 lines removed
across 370 files. Wow!</p><h2 id="what-are-we-doing-next" class="anchor">What Are We Doing Next?</h2><p>If we’ve done our jobs, the new guides shouldn’t need any major updates for the
foreseeable future, and the new structure should make it easier to extend,
improve, and add to our guides when new features come along.</p><p>Looking beyond the guides section, we have a lot of ideas (and work planned) to
further improve the Pebble Developer site, and we’re excited to share it with
you as soon as it’s ready.</p><p>As always, keep the feedback and bug reports coming! Hopefully nothing is
missing or broken, but if it is be sure to tweet
<a href="https://twitter.com/PebbleDev" title="" class="">@PebbleDev</a> on Twitter or find me in our
<a href="https://discordapp.com/invite/aRUAYFN" title="" class="">Discord</a> group.</p>]]></content>
  </entry>
  
</feed>
